There are tons of articles that explain Navigation Stack, which was introduced with iOS 16, but most of these pretty much reshare what Apple’s documentation says — and are similar to the sample Colors app that Apple shared. While that’s good to grasp the basics, it’s far from enough to understand how to incorporate Navigation Stack in a real app.
By the end of this tutorial, we’ll have an enum-based approach with a concrete example explaining how to incorporate deep navigation with expected Tab view behavior.
So, let’s dive right into it by building a Tab View:
struct TabScreenView: View {
//enum for Tabs, add other tabs if needed
enum Tab {
  case home, goals, settings
 }

 @State private var selectedTab: Tab = .home

 var body: some View {

  TabView(selection: $selectedTab) {

     HomeScreen()
      .tabItem {
         Label("Home", systemImage: "house")
       }
      .tag(Tab.home)

     GoalsScreen()
      .tabItem {
         Label("Goals", systemImage: "flag")
      }
      .tag(Tab.goals)

     SettingsScreen()
      .tabItem {
        Label("Settings", systemImage: "gear")
      }
      .tag(Tab.settings)
    }
   }
}
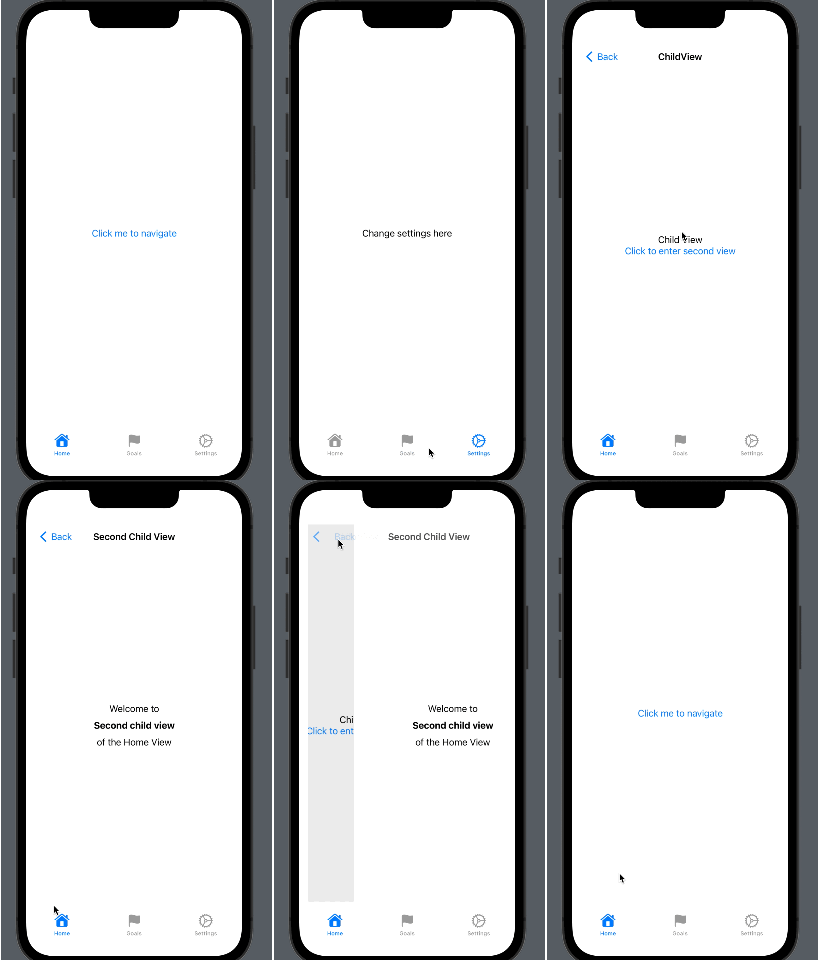
We have a basic TabView that lets you switch between three screens using tabs. I added some dummy data on a few views and linked them to Home Screen, so this is what we have for now:

Notice that as I am on my second child view, and when I press the tab button, it doesn’t take me back to the home page, so I have to press back twice to reach home.
This could be multiple taps if the app is big and your users won’t thank you for it.
There are two features that most tab bars have on tap of the tab icon — Pop to root view and Scroll to top. You can skip to the next paragraph if you know what it means.
- Pop to root view — No matter how deep you are within a tab, tapping on the tab icon brings you to the home/root view. For instance, you have a movie app with a search bar on the home view that shows movie results on the second view, and you can tap on one of the results, and it navigates to a third view that shows the details of the movie. Pressing the tab icon should bring you back to the search bar.
- Scroll to top is easy enough. If you are on the home view and press the tab icon, it should scroll to the top.
Now, how to incorporate both of these behaviours? We need to know a few things:
- When a tab icon is tapped and whether the tapped icon is the currently active tab.
- Whether to pop to root or scroll to top
- And finally, the how.
Let’s tackle these steps one at a time.
Tab icon click → Contrary to the first thought that crosses the mind, onTapGesture doesn’t work with Tab icons which is a bit weird. So we go with a different approach. The TabView can be controlled simply by setting the selectedTab binding, so, that’s our way to go. Let’s see it in code:
{
  ...code

  TabView(selection: tabSelection()) {

  }
  ...code
}
extension TabScreenView {

 private func tabSelection() -> Binding<Tab> {
    Binding { //this is the get block
     self.selectedTab
    } set: { tappedTab in
     if tappedTab == self.selectedTab {
      //User tapped on the currently active tab icon => Pop to root/Scroll to top
     }
     //Set the tab to the tabbed tab
     self.selectedTab = tappedTab
    }
 }
}
We create a tabSelection function that acts as our middleman and takes care of getting and setting the binding selectedTab.
This takes care of our first problem, and we know when a tab is tapped and where we are when that happens. To solve the second problem, we’ll have to deal with navigation.
Now NavigationStack and TabView work together to provide a seamless user experience. For example, if you need to bring the user back to the root view, one way would be to pass bindings from the Tab View and toggle them to pop to root. But that will clutter everything, and you’ll have to pass a few bindings to every view. Not the best way to do these things.
So, what we do instead is leverage enums and SwiftUI’s Navigation Stack.
Here’s a basic NavigationStack without enums:
//Use an array of Integers with each integer pointing to a destination view
@State private var path = [Int]()
//or use @State private var path = NavigationPath()


NavigationStack(path: $path) {//Trailing closure for root:

  NavigationLink(value: 1) { //Based on what this value is the navigation Destination shall be decided
    Text("Click me to navigate") //Label
  }

  ...other code

  //Our switching happens here
  .navigationDestination(for: Int.self) { value in
    //Based on your need, you may add other conditions or better use a switch
    if value == 1 {
      ChildView()
    }
  }
}
Let me explain more for those who never saw this before. A Navigation Stack needs a binding to a NavigationPath as this is like its Source of Truth. This path tells the stack where we are, and each screen you add to your app’s navigation gets appended to this path. So, if you clear out the path, you are back at the root of the path, the root view.
Now let’s create some enums. For time’s sake, I’ll only create a home navigation stack.
 //an enum for each Tab that tracks the views of the Tab
 enum HomeNavigation: Hashable {
  case child, secondChild
 }

//Declare navigationStacks for each of the tabs
 @State private var homeNavigationStack: [HomeNavigation] = []

//Pass this state to HomeScreen
  HomeScreen(path: $homeNavigationStack)
      .tabItem {
       Label("Home", systemImage: "house")
      }
      .tag(Tab.home)
Now this homeNavigationStack will keep track of which screen we are on within the Home tab. We clear out this array, and we are back to the root. We will need to create stacks for each of the tabs. This keeps the logic for each of the tabs clearly marked and segregated.
After incorporating the navigation into our HomeScreen, we get the following:
struct HomeScreen: View {
//This path can come from environmene object View Model
 @Binding var path: [HomeNavigation]

 var body: some View {

  NavigationStack(path: $path) {

//Specify the enum of the screen you want as the destination view
   NavigationLink(value: HomeNavigation.child) {
    Text("Click me to navigate")
   }

   //This is always declared at the root
   .navigationDestination(for: HomeNavigation.self) { screen in
      switch screen {
       case .child: ChildView()
       case .secondChild: SecondChildView()
      }
   }
   .navigationTitle("Home")
  }
 }
}
Note: Swift won’t let you pass the path as is. It has to be Hashable!!! Notice that I added the conformance to the Hashable for the HomeNavigation enum above.
Now that we’ve set up the navigation, each screen will have an enum associated with it, which Swift automatically appends to the path array as one navigates. Now, all we need to do is empty this, and we’re back to root.
Let’s update our tabSelection function:
private func tabSelection() -> Binding<Tab> {
  Binding { //this is the get block
   self.selectedTab
  } set: { tappedTab in

   if tappedTab == self.selectedTab {
    //User tapped on the currently active tab icon => Pop to root/Scroll to top

      if homeNavigationStack.isEmpty {
       //User already on home view, scroll to top
      } else {
      //Pop to root view by clearing the stack
       homeNavigationStack = []
      }
   }

   //Set the current tab to the user selected tab
   self.selectedTab = tappedTab
  }
 }
Scrolling to top is easy. Add a State and pass it to the HomeScreen and add an onChange that checks if that binding is true and scrolls to an id. Here is a Stack Overflow thread about this topic.
Finally, let’s talk about passing something between the views. As our app grows, we start creating more subviews. But how will you pass something if your navigation destination is at the root where those arguments don’t exist?
Consider a Person struct:
struct Person: Hashable {
  let name: String
  let lastName: String
}
Assume that the ChildView needs to pass this Person to the Second Child. We could retrieve a list of persons and display those on the child view, and the Second child is the person detail view.
Now at Home, we have no idea what persons we’ve fetched or not. Let’s solve this common yet crucial problem.
Update the HomeNavigation enum as follows:
enum HomeNavigation: Hashable {
  case child, secondChild(Person)
 }
We just added the associated type, and that’s pretty much all. Now in our ChildView, we can send the data of the Person type pretty easily.
struct ChildView: View {

  let person = Person(name: "Akshay", lastName: "Mahajan")

  var body: some View {
    VStack {
     Text("Child View")

     //NOTICE THE PERSON ADDED TO THE VALUE
     NavigationLink(value: HomeNavigation.secondChild(person)) {
      Text("Click to enter second view")
     }

    }
    .navigationTitle("Child")
   }
  }
And our navigationDestination is updated as follows:
.navigationDestination(for: HomeNavigation.self) { screen in
    switch screen {
     case .child: ChildView()
     case .secondChild(let person): SecondChildView(person: person)
    }
   }
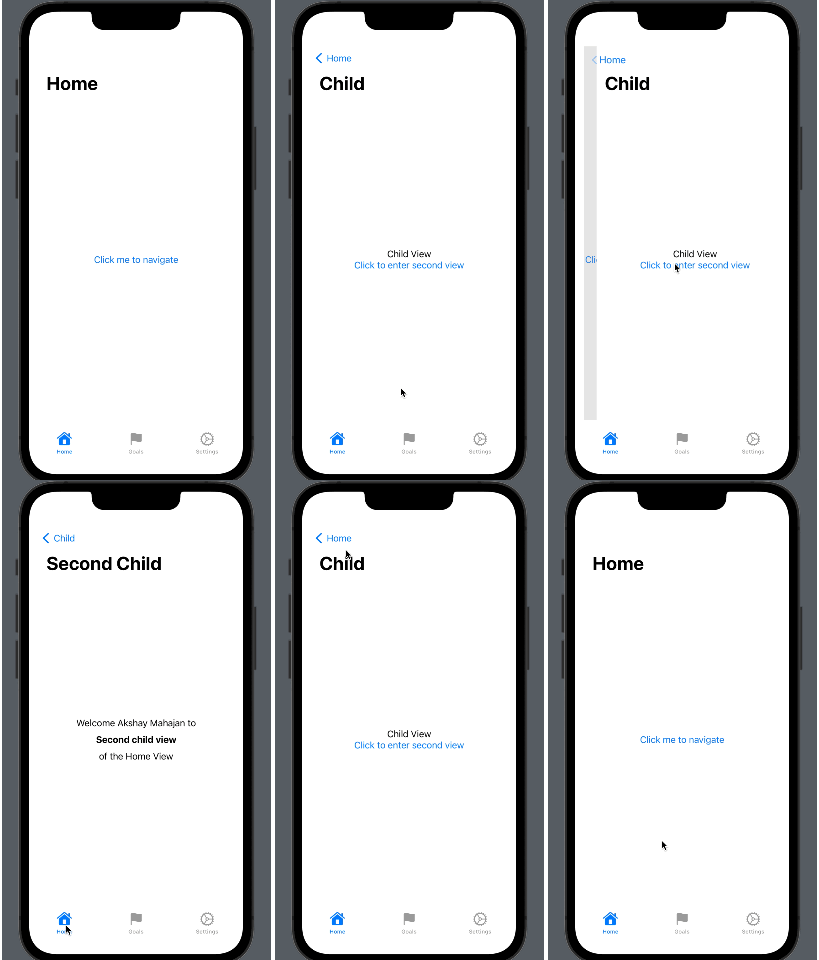
Now our Tab View behaves as expected, and the app flow looks like this:

This gave me quite some grief. Check out my sample app on GitHub.
Thanks for reading.
The Ideal TabView Behaviour With SwiftUI Navigation Stack was originally published in Better Programming on Medium, where people are continuing the conversation by highlighting and responding to this story.