A simple guide to calculate and reduce the depth of a quantum circuit with Qiskit.

Have you ever wondered if your quantum circuit will run efficiently on a real quantum device? Can you even do anything to improve that? — Well, the answer is yes! To achieve this we need to understand the concept of circuit depth and use it to our advantage.
In order to do that let us dive deep with quantum circuit depth to find out what it actually is and what it has to do with playing Tetris, how you can compute it in Qiskit, and finally how to reduce it. (Small spoiler: shallow circuits are the best ones!)
1. What is Circuit Depth and How is it Computed?
In general, circuit depth refers to the length of the longest path from the circuit input to the circuit output, with each gate counting as a unit. Simply put, it is the minimum number of steps needed for quantum gates to be applied in parallel to execute a quantum circuit.
How can you exactly picture it? Well, you can simply think of it as playing Tetris! As you can see in the example below you can rotate the circuit and let the gates fall as far as possible. The number of layers is then your circuit depth. That would be 9 for our example.

Note if you have single-qubit gates acting in parallel on different qubits, they can fall into the same layer. However, if you have various single-qubit gates acting on the same qubit, you cannot have them in the same layer. Similarly, for multi-qubit gates such as cNOT, as long as the control- and target bits of the subsequent gates don’t overlap, they can fall into the same layer, otherwise, you need more layers.
How can you compute the circuit depth? There’s simply a built-in function in Qiskit that returns the circuit depth of your given quantum circuit:
QuantumCircuit.depth()
This is always an integer number, representing the number of layers, the gates fall into.
2. Why does it Matter?
Great! Now you know what the circuit depth is and how you can compute it. Now you may ask why is it a thing at all. How does that even relate to running a circuit on a real quantum computer more efficiently? The short answer is to avoid noise errors. Today’s devices are quite noisy and the deeper your quantum circuit, the higher the probability of an error occurring when executing it. So, shallow quantum circuits are less susceptible to noise errors and are therefore better!
This gets even more clear when you look at how a quantum circuit exactly runs on an actual quantum device. For example, to do this on IBM’s quantum computers, your circuit needs to be transpiled. What does that mean? It simply means you need to modify your circuit entirely to match the topology of a specific quantum device. Sounds complicated? Well, you don’t need to worry about that at all, we’re lucky that Qiskit has again a built-in function to do this job for us. You can read all about it here.
The main takeaway for us is that the transpiled circuit looks different than the original one and it definitely has a larger circuit depth. More reason to ensure that the depth of our original circuit is minimized!
3. How to reduce your Depth?
Nice! You know now why it is important to reduce the circuit depth if you want to run your circuit on a real quantum device. But how do you actually do it? Let us now look into reducing our circuit depth. Let us now learn how to get shallow!
We will explore this concept using an example: preparing an 8-qubit Greenberger-Horne-Zeilinger (GHZ) state. The GHZ state is a highly valuable entangled state, particularly for evaluating multi-qubit interactions that play a crucial role in developing large-scale quantum computers. You can learn more about it here. In fact, this spring’s IBM Quantum Challenge was also exactly on this topic, where you could construct your own 127-qubit GHZ state!
The basic 8-qubit GHZ state can be constructed using the following code:
from qiskit import *

#basic 8-qubit GHZ state
qc = QuantumCircuit(8)

#Step 1: prepare the first qubit in superposition
qc.h(0)

#Step 2: entangle all the subsequent qubits with the first one
qc.cx(0, 1)
qc.cx(0, 2)
qc.cx(0, 3)
qc.cx(0, 4)
qc.cx(0, 5)
qc.cx(0, 6)
qc.cx(0, 7)

qc.draw("mpl")
print("Circuit depth: ", qc.depth())
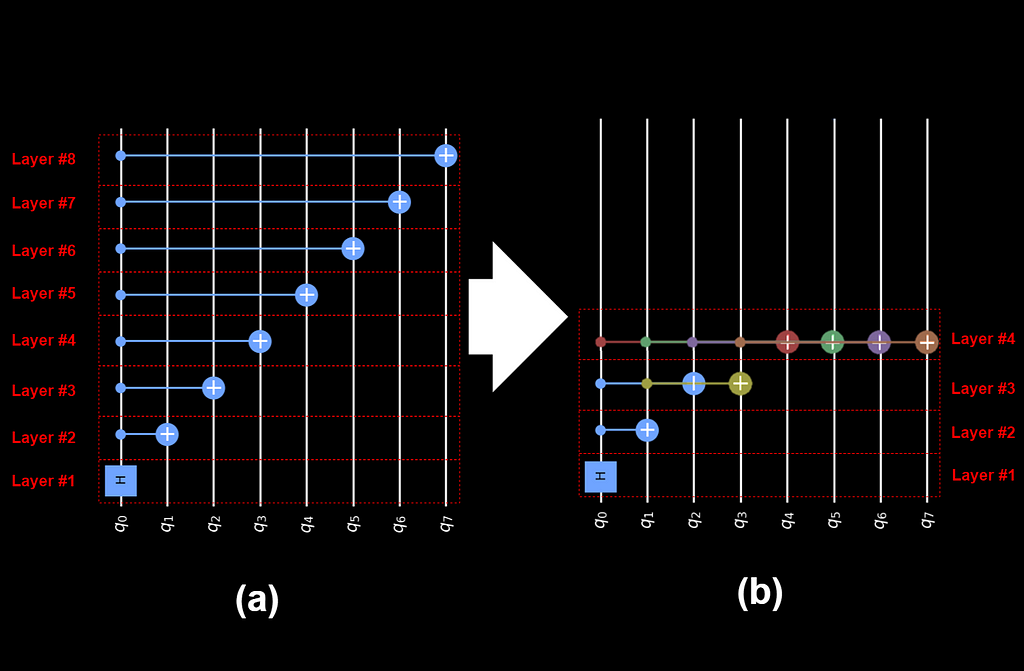
It looks like this:

And has a circuit depth of:
Circuit depth: 8
How can we improve that? We actually need to think about the asymptomatic running time and how to execute gates in parallel. Or, to put it more simply: We play Tetris!
As you can see all the cNOTs have q0 as their control-bit and are therefore blocked from falling into the same layer. How can we change this? We can simply stack the cNOTs iteratively in such a way they fall more and less in the same layer. We are allowed to do this because not all the cNOTs should necessarily have q0 as their control-bit but actually any qubit that has already interacted with q0 in our circuit. Kinda neat! 🙂
The resulting code to construct our optimized 8-qubit GHZ state is:
from qiskit import *

#optimized 8-qubit GHZ state
qc = QuantumCircuit(8)

#Step 1: prepare the first qubit in superposition
qc.h(0)

#Step 2: entangle all the subsequent qubits indirectly and directly with it
qc.cx(0, 1)

qc.cx(0, 2)
qc.cx(1, 3)

qc.cx(0, 4)
qc.cx(1, 5)
qc.cx(2, 6)
qc.cx(3, 7)

qc.draw("mpl")
print("Circuit depth: ", qc.depth())
And the circuit looks like this:

And our circuit depth is:
Circuit depth: 4
Exactly half of the basic circuit! That’s amazing! As the number of qubits increases, the benefits of this method become increasingly apparent. For example, in the case of a 127-qubit GHZ state, we would only require a circuit depth of 8 instead of 127.
Keep in mind the above method is only an example of how to reduce your depth using parallel gate execution and asymptotic complexity. There are indeed various other methods such as adaptive measurement method. If interested, you can have a look here.
We started our journey with a simple question and got deep with circuit depth to only find out shallow is better after all. Finally, we played Tetris to reduce the circuit depth of an 8-qubit GHZ state by half — a method that can be extended to higher GHZ states. And there you have it! Congratulations on reaching the finish line! 🙂
Thanks for reading and stay curious!
Playing Tetris With Quantum Circuits was originally published in Better Programming on Medium, where people are continuing the conversation by highlighting and responding to this story.