Trying StarChat 16B large language model on a PC

Large language models (LLMs) are the greatest hype recently. It started with ChatGPT, but now there are numerous open source or openly available (open access?) models to try locally. Most of them are on Hugging Face.
Building (training) an entire LLM model requires quite massive resources, but the opportunity to use these available (pretrained) models is very interesting and requires fewer resources. In this article, I explore this option by running the StarChat 16B code assistant model on a desktop PC.
The system I use for trials has an RTX 3090 GPU with 24GB VRAM, a 16-core Ryzen 5950 CPU, and 128GB system RAM. The larger system RAM allows me to play with the default model settings, as the 16B parameter StarChat model fits into the 128GB RAM fine but requires a quantization approach to fit into the smaller GPU 24GB VRAM. As quantization reduces memory use, and the model precision, I try to see how much VRAM it takes to fit the 8-bit and 4-bit quantized models and how quantization affects the model’s performance.
The choice of StarChat is because I have commonly played with LLMs as code assistants, but the general approach of getting an LLM to run locally and doing some basic evaluation on it should generalize quite well. The code/notebooks for this article are available on my GitHub.
Infrastructure Setup
Running LLM experiments on a GPU requires having a working CUDA environment, along with a working PyTorch environment, and a bunch of other things. Well, Tensorflow works fine too, but I finally accepted that Hugging Face just wants to default to PyTorch.
Matching all the CUDA and PyTorch (or TF) versions is always a pain for me for installs and configuration management. I have found Docker to be very helpful for this. Using a pre-built PyTorch+CUDA or TF+CUDA Docker image makes sure all the versions are always set up to just work together, and I can just concentrate on using them. Of course, the caveat is to require nvidia-docker package. The added benefit is if I upgrade the Docker image to a new version, it upgrades the tools and libraries at once to compatible versions. And all this is done by the authors of the Docker image for me (e.g., PyTorch/TF team). Brilliant. Thanks.
This is the Dockerfile I used:
FROM pytorch/pytorch:2.0.1-cuda11.7-cudnn8-devel

ENV TZ=Europe/Helsinki

RUN ln -snf /usr/share/zoneinfo/$TZ /etc/localtime && echo $TZ > /etc/timezone &&
 apt install software-properties-common jq nano; add-apt-repository ppa:deadsnakes/ppa &&
 apt update -y; apt upgrade -y

RUN pip install --upgrade setuptools pip pipenv

ENV PROJECT_DIR /mystuff

RUN mkdir ${PROJECT_DIR}

WORKDIR ${PROJECT_DIR}

RUN pip install --verbose numpy pandas matplotlib tqdm scipy scikit-learn transformers langchain huggingface_hub sentence_transformers accelerate bitsandbytes ipywidgets
RUN pip install --verbose jupyterlab

COPY jupyter_start.sh ${PROJECT_DIR}/

COPY overrides.json /opt/conda/share/jupyter/lab/settings/
Half of this Dockerfile is probably unnecessary but rather leftovers from all my copy-pasting of my old Dockerfiles. But it worked for me here.
The base image is a CUDA-devel package from PyTorch. The bitsandbytes library that Hugging Face uses for quantization seems to need to recompile some CUDA-related code. The errors I got without the CUDA-devel base image were interesting to debug, as usual. Using the above base image fixed it all finally. Thanks to some random commenter in one of bitsandbytes’ GitHub issue threads. Unfortunately, there are too many of those that I cannot find which one or who it is now.
Loading the Model Locally
Sometimes, it is nice to host the model completely locally without loading anything off the internet. And have more faith in it not sending your code to a random web service. With Hugging Face, downloading the model locally is as simple as cloning the git repo from the Hugging Face page. Here’s the code to do that:
git clone https://huggingface.co/HuggingFaceH4/starchat-beta
Once this is done, Hugging Face with the local_files_only parameter tries to load the model from the local disk instead of from the online Hugging Face repo. It tries this for the model tokenizer and the model itself:
from transformers import AutoTokenizer, AutoModelForCausalLM, pipeline, AutoModelForSeq2SeqLM

tokenizer = AutoTokenizer.from_pretrained("starchat-beta", local_files_only=True)
# this load the full model:
model = AutoModelForCausalLM.from_pretrained("starchat-beta", local_files_only=True)
# these load the space-optimized 4 bit and 8 bit quantized versions:
# model = AutoModelForCausalLM.from_pretrained("starchat-beta", local_files_only=True, load_in_4bit=True)
# model = AutoModelForCausalLM.from_pretrained("starchat-beta", local_files_only=True, load_in_8bit=True)
Once the model is loaded, one simple way to use it is with the Hugging Face pipelines:
import torch
from transformers import pipeline

pipe = pipeline("text-generation",
                model=model,
                tokenizer=tokenizer,
                torch_dtype=torch.bfloat16,
                device_map="auto")
The parameter device_map=”auto” makes the Hugging Face code choose the GPU to use automatically, assuming you run it in the CUDA Docker and there is a GPU available.
Performance Evaluation Setup
To evaluate the effect of quantization on the model performance, I need some code generation templates and ways to check the results. OpenAI Human-Eval is available on GitHub, so I used that. You need to clone it to install it:
git clone https://github.com/openai/human-eval
cd human-eval
pip install -e .
Load the “test set” (read_problems()):
from human_eval.data import write_jsonl, read_problem
from human_eval import execution

problems = read_problems()
problem_test=problem["test"]
user_prompt=problem["prompt"]
Create the prompt/input for the LLM to get a response to the code problem:
prompt_template = "<|system|>{system_prompt}n<|end|>n<|user|>n{query}<|end|>n<|assistant|>"
system_prompt="you are a smart programming assistant. provide a python3 implementation of the following function:"

prompt = prompt_template.format(system_prompt=system_prompt, query=user_prompt)The prompt template comes from the HF model card example. In other HF LLM’s, the approach should be similar, just in this case it is about code problems and thus the system prompt is what it is.
Finally, to collect system resource use, I asked ChatGPT to give me a script to collect CPU and GPU load + System RAM and GPU VRAM use. After a few iterations, this is what I got and used in the end:
#!/bin/bash

if [ $# -eq 0 ]
  then
    echo "No output file provided. Usage: ./log_gpu_cpu_mem.sh /path/to/output.csv"
    exit 1
fi

FILE=$1

# Write header to file
echo "timestamp,epoch_seconds,cpu_usage [%],memory.used [MiB],memory.total [MiB],gpu_utilization [%],gpu_memory.used [MiB],gpu_memory.total [MiB]" > $FILE

while true; do
    TIMESTAMP=$(date +%Y-%m-%d_%H:%M:%S)
    EPOCH=$(date +%s)
    CPU_USAGE=$(vmstat 1 2 | tail -1 | awk '{print $15}')
    MEMORY_USAGE=$(free -m | awk 'NR==2{printf "%s", $3}')
    MEMORY_TOTAL=$(free -m | awk 'NR==2{printf "%s", $2 }')
    GPU_STATS=$(nvidia-smi --query-gpu=utilization.gpu,memory.used,memory.total --format=csv,noheader,nounits)
    echo "${TIMESTAMP},${EPOCH},${CPU_USAGE},${MEMORY_USAGE},${MEMORY_TOTAL},${GPU_STATS}" >> $FILE
    sleep 1
done
Can you see why I like to talk to my coding assistant models rather than try to stitch random Stack Overflows together? Well, sometimes, Stack Overflow is easier or better, but you get into a pattern. I did at least try to verify this script against the top and nvidia-smi commands. The results seemed correct :).
Generate Answers
To generate the code solutions to the problems in the Human Eval dataset, I call the pipeline with the system prompt and user prompt as set up above:
prompt = prompt_template.format(system_prompt=system_prompt, query=user_prompt)
start_time = time.time()
outputs = pipe(prompt,
               max_new_tokens=1024,
               do_sample=False,
               eos_token_id=49155)
answer = outputs[0]["generated_text"]
There are a set of general parameters often discussed when using an LLM to generate text (code in this case):
- temperature: amount of randomness/creativity to apply. Higher numbers should make the model more “creative.” A temperature of 0 (zero) is sometimes used to get fully deterministic results (always the most likely tokens, I guess). With the Hugging Face model API, it gave me an error that the temperature cannot be zero. Instead, I had to set do_sample=False to get the same result.
- top_k: consider at most top k words with the highest probability when sampling output
- top_p: consider only words in top p percentage of most likely words when sampling output.
Since my goal in this article was to explore the usability of LLMs on consumer hardware, and I disabled sampling, the above parameters are irrelevant. But they are useful to keep in mind. The configuration in the above code, with sampling disabled, should provide deterministic output of most likely tokens, making it easier to compare model versions.
Another relevant parameter is max_new_tokens. It is the maximum number of tokens the model will generate, excluding the existing and given prompt tokens. I originally used the value of 256 here, which was from some Hugging Face examples. However, I noticed some of the model’s generated answers had been cut off too soon, so I increased the max to 1024.
StarChat has a maximum context length of 8192 tokens, so I might as well have used that or nothing, but 1024 worked well enough.
Evaluating the Answers
The OpenAI Human Eval repo has methods to run evaluations on the problems in their dataset. Like this:
from human_eval import execution

#params: problem, generated code (completion), timeout, completion_id
result = execution.check_correctness(problem, code_to_check, 10, 1)
Here execution.check_correctness is a call into the OpenAI code to run the tests defined for a problem against the generated code for that problem. The timeout is to avoid eternal loops in the generated code and completion_id seems to be an option for some internal more detailed tracking if needed. I just set it to the static value of 1 here.
Here are the results of my test runs on different model configurations:
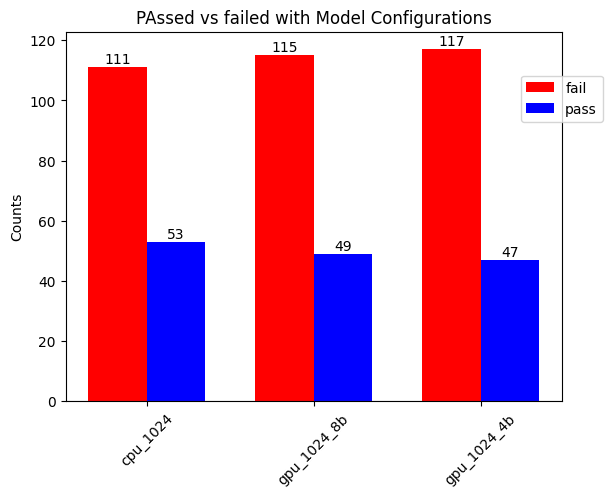
In the above figure, cpu_1024 refers to the model being loaded in its default (full weights) configuration into system RAM and using only the CPU for inference. The gpu_1024_8b and _4b refers to the quantization configuration used. The red bar is the number of failed tests in the Human Eval dataset; blue means they passed.
After a brief look at the test results, I noticed some failed due to simple issues such as missing an import math statement. Adding this import to the generated code made two more tests pass, which is why there are two numbers for tests passed here. Perhaps the number with two less would be more correct, but it shows that some of the issues in the generated code are not too big. Another issue I noticed was that sometimes the code used constructs not available in Python 3 but in Python 2.
This is why I added “python3” to the system prompt. It had no effect, though. I did not try to debug the failures more extensively as I was mainly focusing on exploring running the model on a consumer desktop system.
Here are my two numbers of results (with import math and without):
- CPU: 53/164=32.3%, or 51/164=31,1%
- GPU 8bit: 49/164 = 29.9% or 47/164=28.7%
- GPU 4bit: 47/164=28.7%, or 45/164=27.4%
These seem quite fine results compared to the OpenAI paper on their Codex model underlying the GitHub Co-Pilot, which out of the box, solved 28.8% of the problems. This OpenAI paper is from 2021, so a few years old, but I think my results are quite good. Also, the Hugging Face blog post has some slightly better results (33.6%) for StarCoder (underlying code model for StarChat), so there might be a bit of variance due to whatever reasons.
According to the OpenAI paper, the OpenAI experiments also tried sampling 100 answers from their model using a higher temperature parameter (thus more variation/creativity) and achieved at least one passing result for 77.5% of the test set. The Hugging Face blog post also discussed methods to improve the results, such as prompt tuning.
My goal for this study was to see if / how I could run the 16B StarChat model on consumer hardware, so I did not try the parameters, repeated sampling, or added prompt tuning. But those are good topics to consider and consider if building something bigger on top of these models.
Resource Use and Execution Time
To answer my question on running StarChat type LLM’s at home using consumer hardware, it is relevant to see the following:
- how much memory it takes for different configurations
- does it fit into the GPU VRAM
- how much time it takes to run generation/inference on the model
Not just overall generation time but also time per token. Sometimes, I am interested in the ChatGPT-style interactive experience where the model “writes” the response a word at a time to keep me engaged through the slow inference process.
For token counting, I used the tokenizing approach described in the Hugging Face NLP Course page for Tokenizers:
from transformers import AutoTokenizer

tokenizer = AutoTokenizer.from_pretrained("starchat-beta", local_files_only=True)
#problem is a dict of OpenAI human_eval test set problem definition
prompt = problem["prompt"]
#prompt tokens is the set of tokens in the OpenAI test prompt
prompt_tokens = tokenizer.tokenize(prompt)
prompt_token_count = len(prompt_tokens)
#python code is parsed from the chatty answer of StarChat model
generated_code_tokens = tokenizer.tokenize(row.python_code)
generated_code_new_token_counts = answer_token_count - prompt_token_count
answer_tokens = tokenizer.tokenize(row.answer)
answer_token_count = len(answer_tokens)
answer_new_token_count = answer_token_count - prompt_token_count
Human Eval Prompt Stats
First, some generic stats on the OpenAI Human Eval dataset prompts. Some stats vary across the model configurations (e.g., inference time), but the prompts are always the same. This is the distribution of prompt token counts in Human Eval:
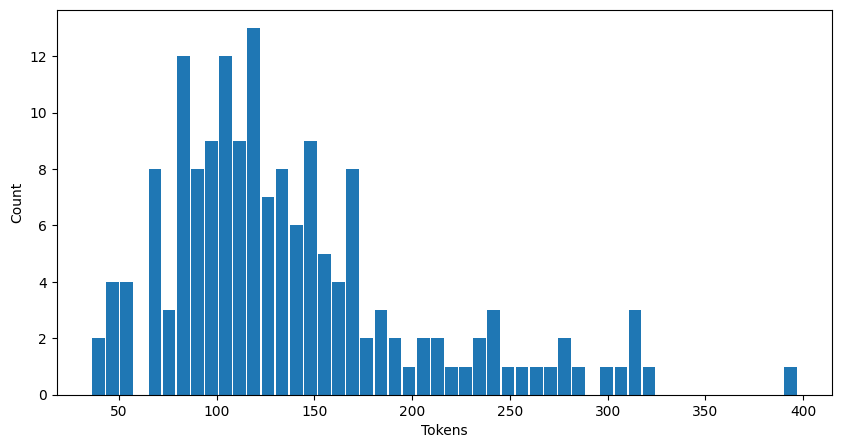
For example, there is one prompt that has close to 400 tokens and about 12 prompts that have about 100 tokens.
When reporting time per token in generation, I calculated it like this:
per_token_generation_time = answer_generation_time / answer_new_token_count
Where answer_new_token_count is the number of tokens that the model-generated answer added to the given prompt input.
Model on CPU / System RAM
First, the CPU/system RAM use and CPU processing load for full, full-weights, model. In this case, no GPU is used, but everything is done on the CPU.
Memory
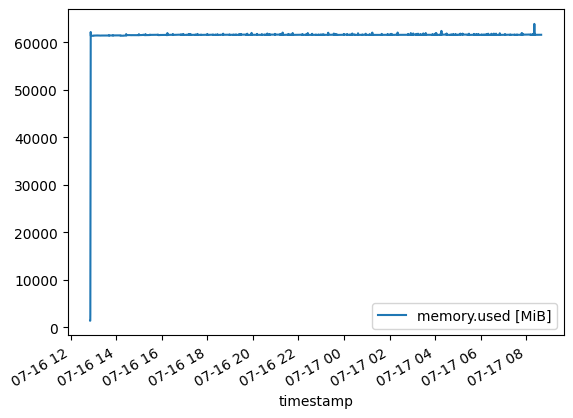
The model loads at the beginning to about 60 GB of RAM use. The initial spike of the graph is quite steep, so looking at it closer, I see that it’s only for the start (load into RAM):
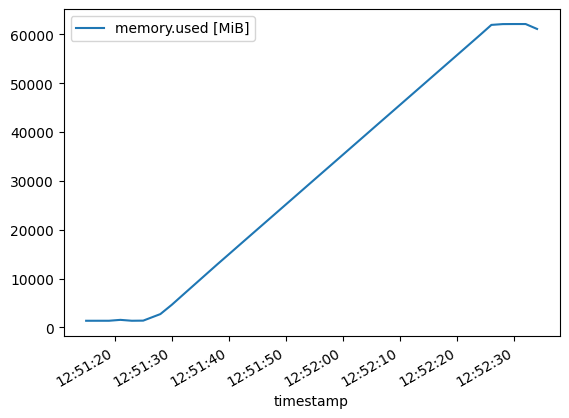
The above image shows the model loading steadily into the memory until it is fully loaded at about 60 GB of RAM. Once the full model is loaded into RAM, the memory use stays quite stable, as shown here:
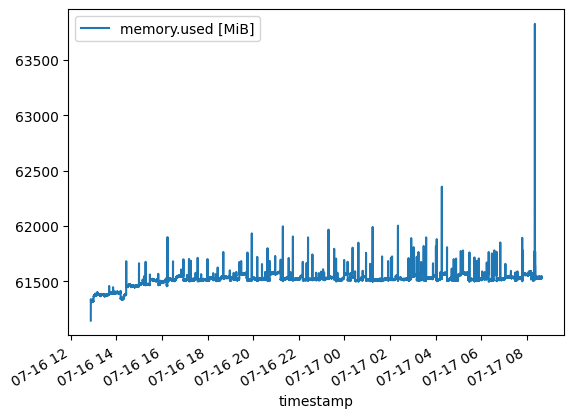
I suppose the model with its weights take 60 GB of memory when it is loaded, and some variation on top is from generating different lengths of answers and results collection. Towards the end, the small spike is likely due to some final processing, report generation, file writing, etc.
CPU Inference Load
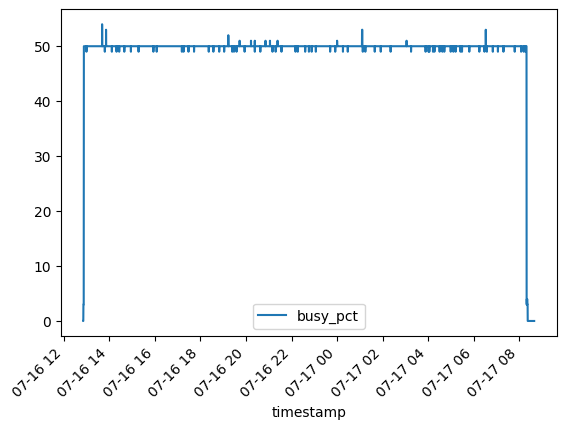
Below is the chart for the CPU usage percentage. It starts from 0% and rises to 50%, where it stays during the inference of all 164 test samples. As mentioned, the CPU is a Ryzen 5950 with 16 cores and 32 threads. Looking at other system metrics, it seems that Hugging Face is using the full 16 cores all the time, and the script I used reports this as 50% CPU usage (32 threads/16 cores).
Answer Generation Time
The following are stats for generating the answers for each Human Eval problem in this CPU-only trial:
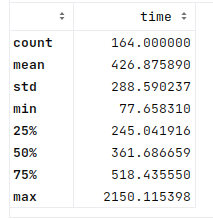
As shown by the above stats, the inference on CPU alone is quite slow here (as expected). On average, it took about 426 seconds to generate the answer on the CPU alone, with a median of about 360 seconds/6 minutes. ChatGPT is not always that fast, or Copilot for that matter, but I would not want to wait six minutes to get answers.
Here’s the distribution of time per answer to each problem in seconds:
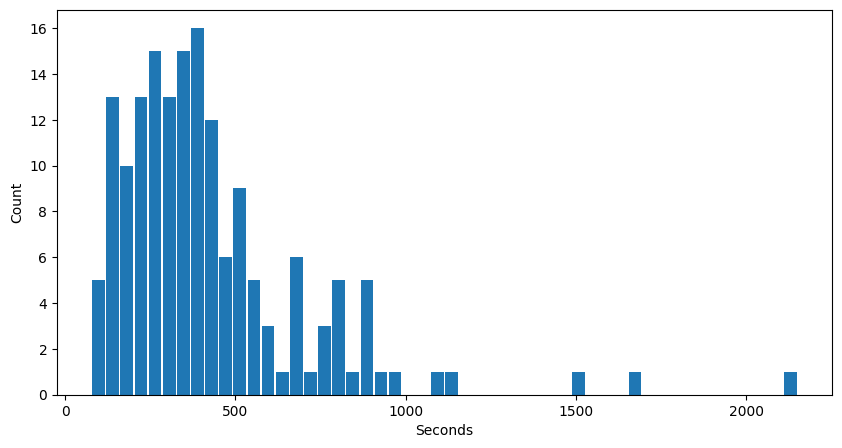
The stats are repeated below, showing the longest time was 2158s to generate an answer to a prompt. The above chart shows that the time is mostly around 100–500s. The average is about 426s, and the median is 361s.

Time per Token
Count of (new) tokens generated in each test sample:
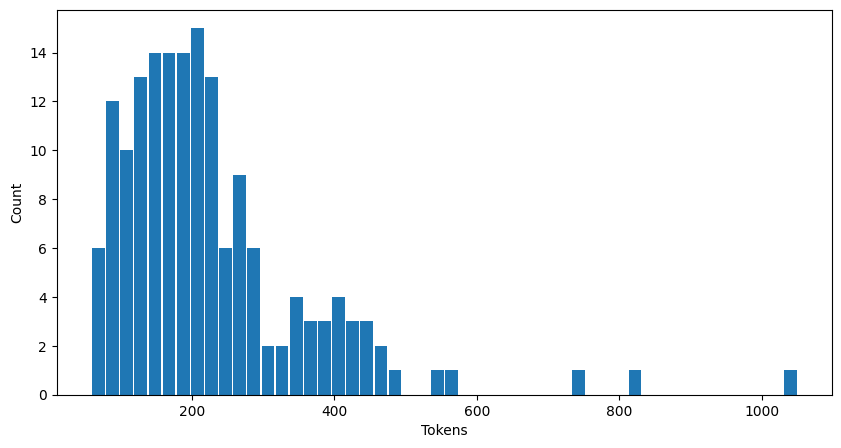
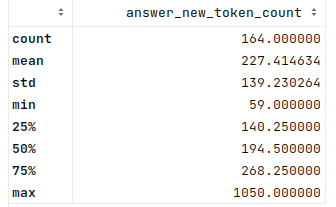
These stats show a slightly puzzling result, where the largest number of tokens generated is 1050, while I specified a max of 1024 in the Hugging Face parameters. Am I counting the tokens wrong, or is the limit parameter not exact?
In any case, it is a good enough indicator for what I need. To evaluate how well this runs on consumer hardware and its performance (including per token time). Here are the binned per token average generation times for each Human Eval problem and generated answer for CPU-only inference:
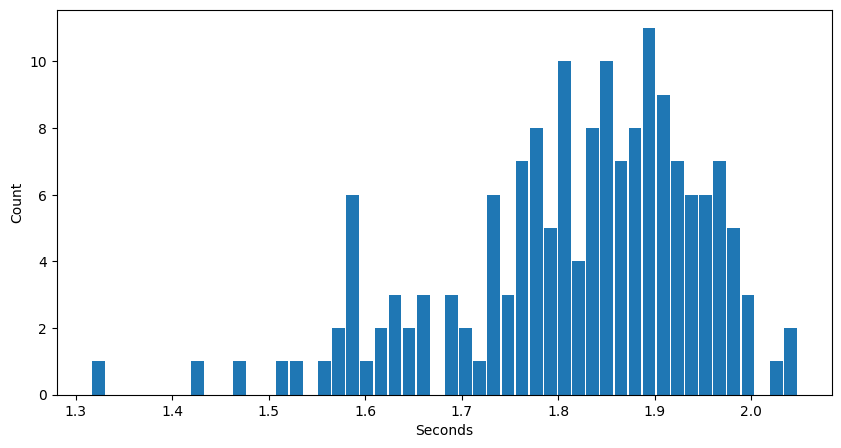
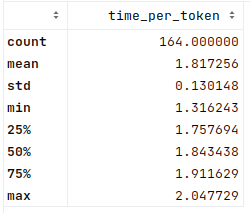
The longest time is an average of 2.05s per token generated for an answer. Since these numbers are averages per answer, it does seem very slow to do CPU-only inference like this. This is expected since CPU inference was never famous for speed.
So, how about the GPU and quantization?
GPU/VRAM in 8-bit quantized
Now to look at the 8-bit quantized version, how well it fits into the 24GB GPU VRAM, what load it puts on the GPU, and the impact on inference time.
Processing Load
This is the GPU utilization rate for the 8-bit version, running all 164 Human Eval problems sequentially:
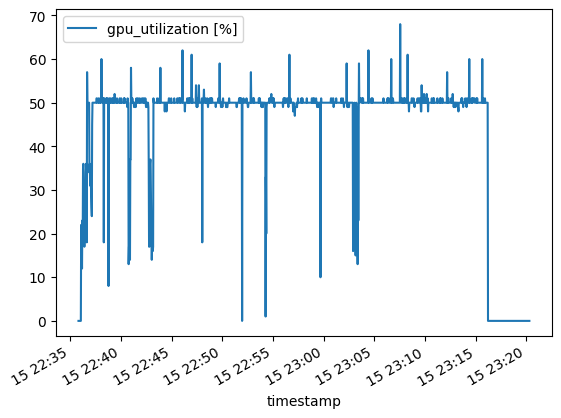
For some reason, the GPU utilization in this 8-bit case stays at about 50%. No idea why. Especially since in the later 4-bit trial, it gets to 100%. Might be some issue with how I used it. In any case, these would be interesting features to know if building such systems for real use and how to optimize them possibly.
Just out of interest, the following graph shows the CPU processing load during the 8-bit GPU inference:
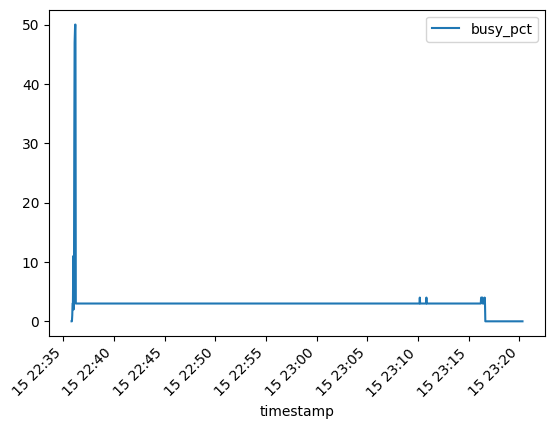
It shows how the CPU is highly utilized initially when loading the model into GPU VRAM, then drops off to about 3% (of max cores/threads). Looking at the output of top, this is listed as 100%, meaning it is running a single core at 100%. Which translates to 1/32, or about 3%. Not sure what it is running there. Is something limited to a single core, or is my code just busy providing inputs to the model using a single core?
Memory Use
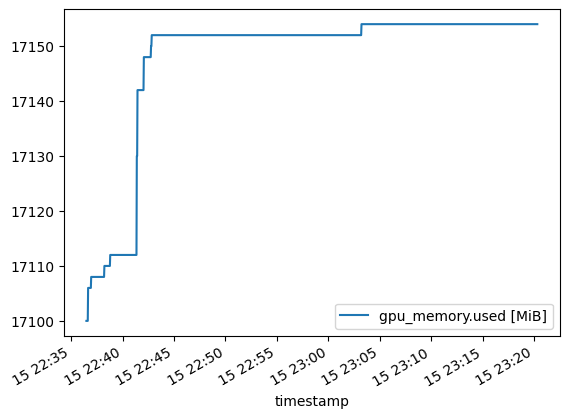
This is the GPU memory use with 8-bit quantization, where the initial model loading takes about 17 GB of VRAM. This is good downsizing from the 50–60GB for the full model in the above CPU-only trial. 17 GB fits into the 24 GB fine, with plenty of space for longer model inputs and outputs.
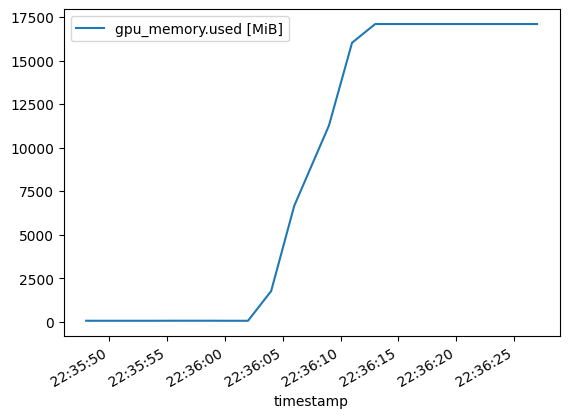
After having loaded the model into memory, VRAM use stays quite constant. Once it reserves some VRAM, it keeps it reserved since the trend is only up.
Answer Time
The time per generated answer is now much lower than in the CPU-only trial:
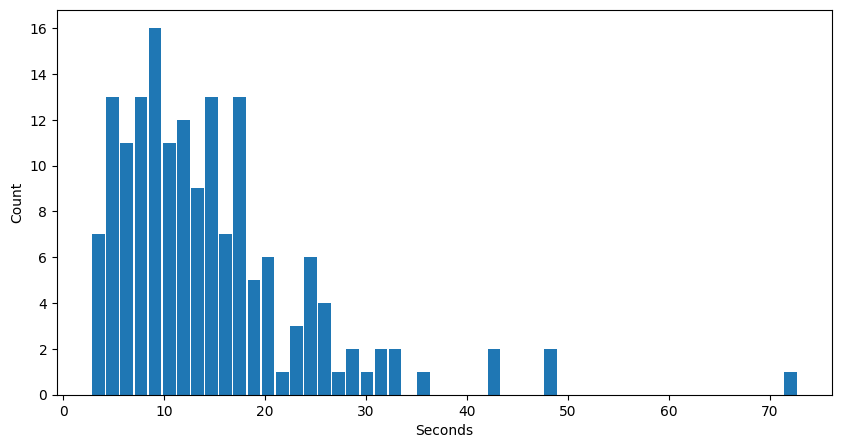
In the CPU trial, the stats were around 427s for mean and 361s for median per generated answers. Here it is about 15s and 13s:
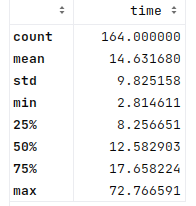
This is a big improvement in speed for GPU vs CPU (as one might expect). And here’s the stats for the new tokens generated per answer:
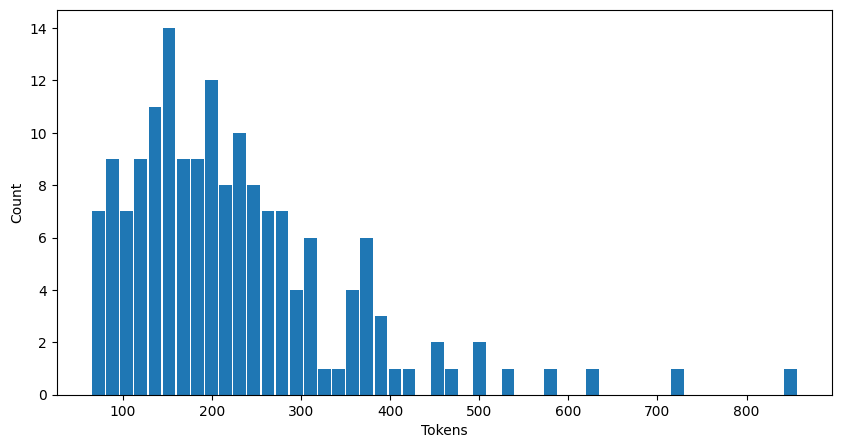
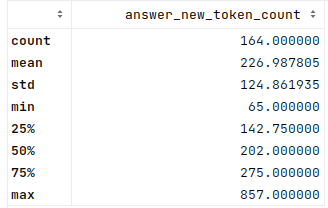
From this, the time per token across the different generated answers:
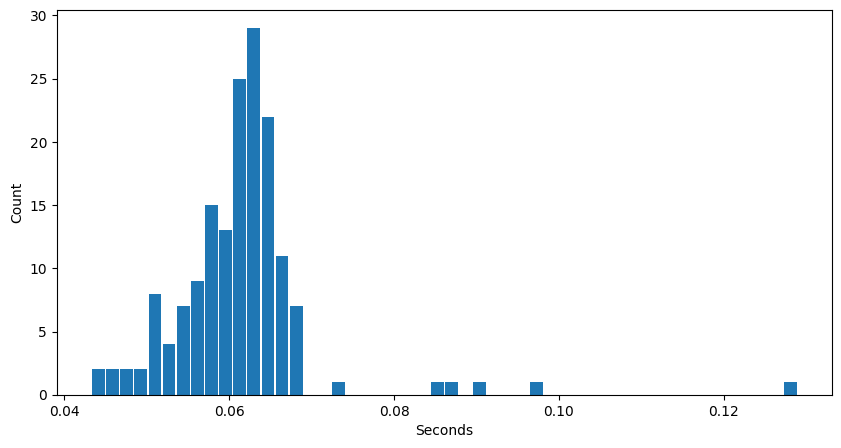
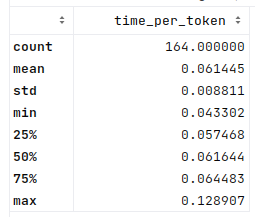
As usual, there are a few outliers, especially towards the high end. But both the mean and median times are about 0.06s per token, nicely down from 1.8s in the CPU trial. This would seem a very useful result.
GPU/VRAM in 4bit quantized:
As I mentioned with the 8-bit quantized version, for some reason, the 4-bit quantized version keeps the GPU at 100% utilization vs the 50% for the 8-bit quantized.
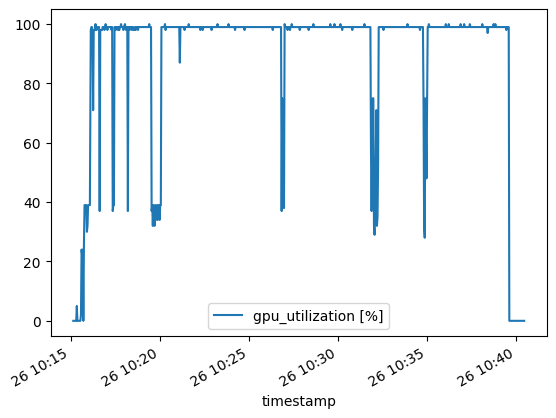
Again, the CPU load spikes in the beginning when loading the model to the GPU but stays constantly low after. Here’s what the chart looks like:
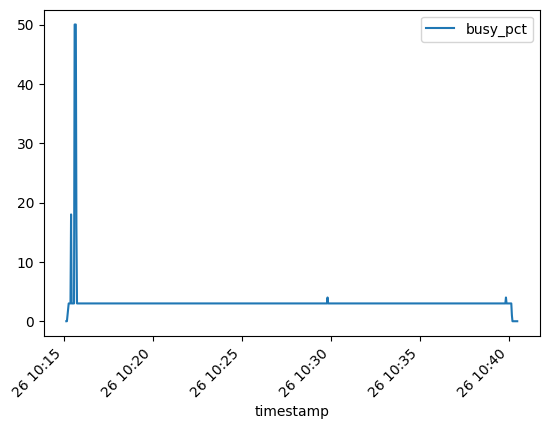
Memory Use
System RAM use is again low, just a minor increase of about 1 GB at model load time:
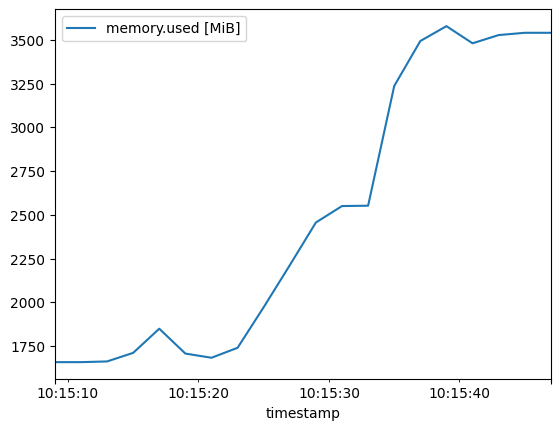
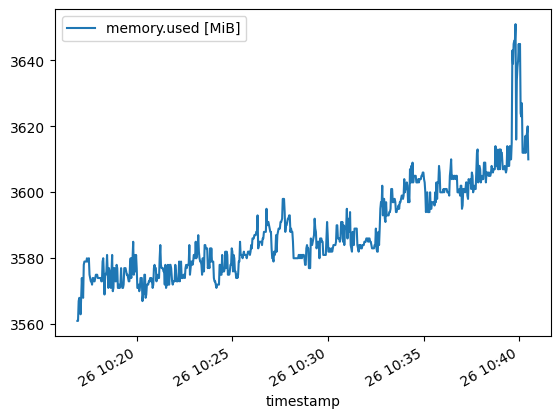
After which, some minor increases of less than 0.1 GB. These are most likely due to other processing or prompts and results collection:
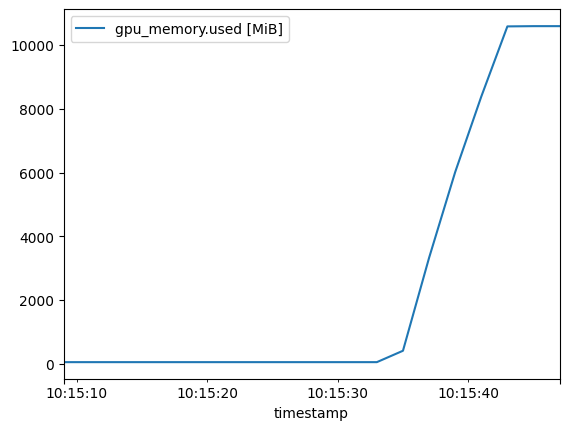
On model load, the GPU VRAM use rises to about 10 GB:
Just like with the 8-bit version, the 4-bit model VRAM use spikes a little in the middle, and the trend is always up. Perhaps, there is some prompt around the middle that causes the spike with a bit more memory use?
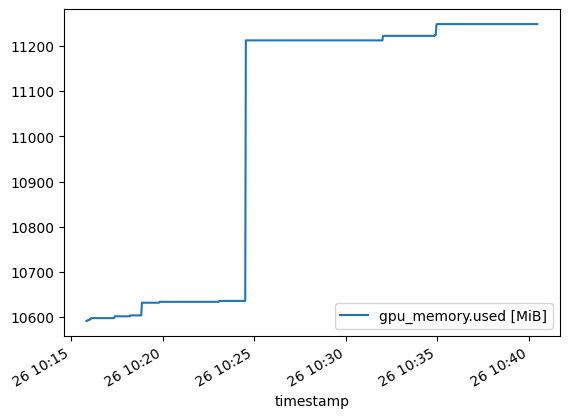
Overall, this 4-bit quantized version takes about 11 GB of memory with these trials, so it might be possible to run with a 12 GB VRAM GPU, which seems a good result for a 16B parameter model.
Answer Time
The answer generation time, in this case, has a mean and median of about 9s and 7s. This is not quite a 50% (or 2x) difference to the 15s and 13s for the 8-bit model, but close. Whether this is due to the 50% vs 100% GPU utilization in the 8-bit vs 4-bit cases, or due to some other factors, I don’t know. But it is an interesting result.
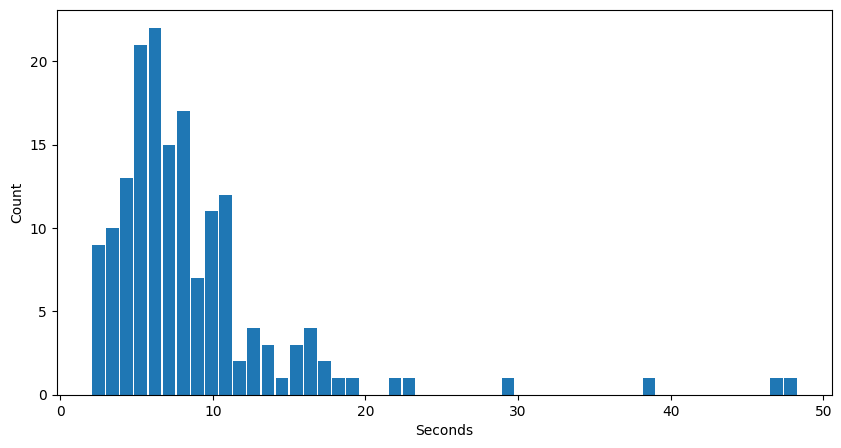
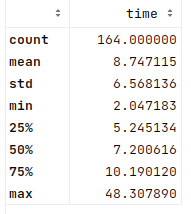
And here’s the number of tokens per answer generated for this 4-bit trial:
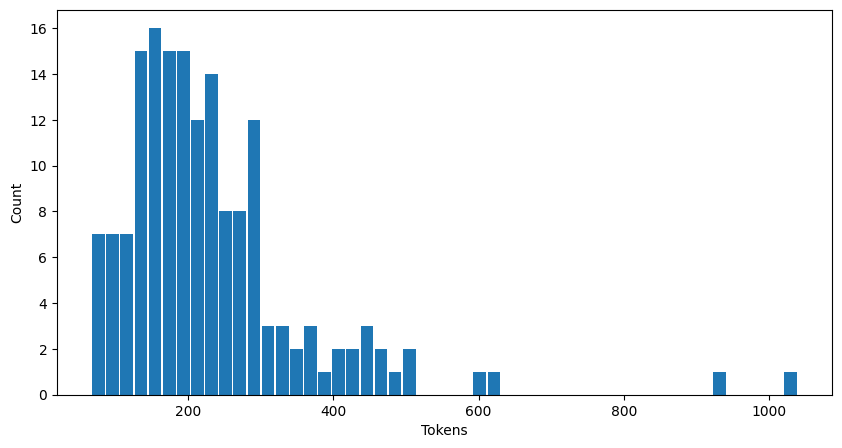
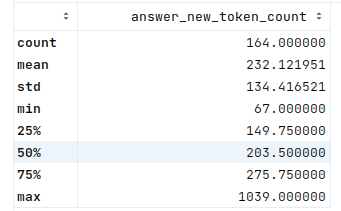
And finally, the interesting part of those token counts — the time to generate per token:
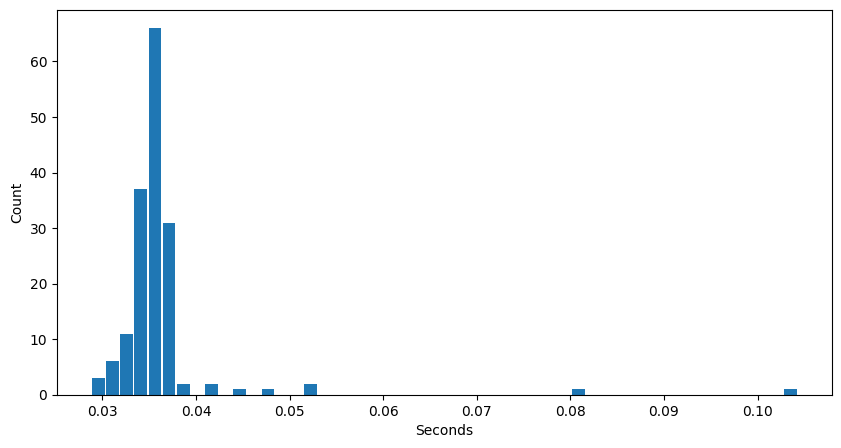
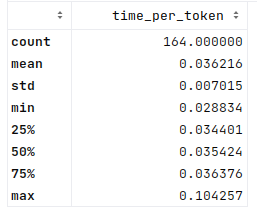
The mean and median in this 4-bit case are now about 0.04s per token. In the 8-bit model, this was about 0.06s for both, so a nice improvement in line with the answering time (as would be expected).
Colorful Comparisons
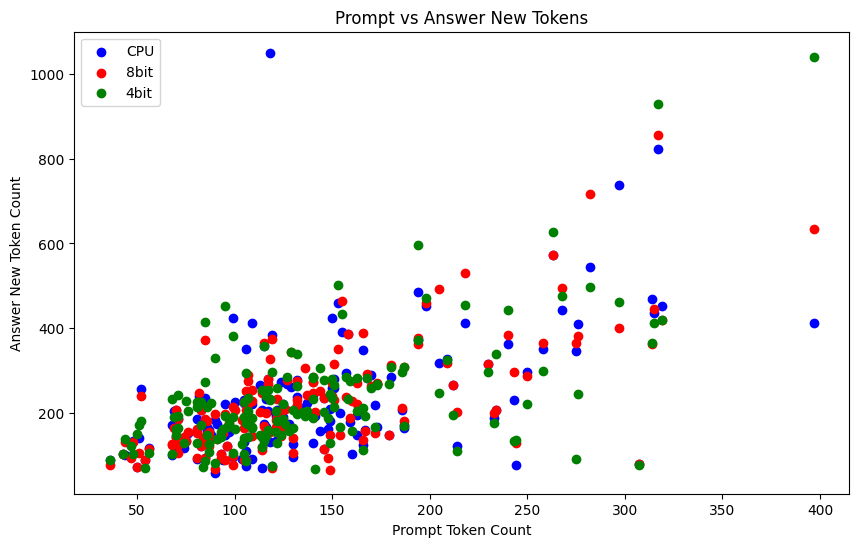
I have been trialing Github Copilot lately for personal use and also had it enabled for this exercise. I was going to plot some of the basic bar plots above, and Copilot suggested code to create some scatter plots. I gave it a try, and it was quite interesting. Such a nice helper copilot, doing exploratory data analysis with me!
From this, I found it an interesting thought to compare some of the metrics in the same plots, such as the prompt size vs the answer size generated. Sometimes, the model would generate only very concise code as a response. Other times, it might get chatty with explanations added. At least the one blue dot here at the left upper corner was where it got excited to write lots and lots of tests with the code.
Here’s the number of prompt tokens vs answer tokens:
After looking at the above plot, I compared the “solution code” vs the overall answer text. Here the “answer” is the full generated answer text, and “generated code” is the Python code part I parsed from the full answer:
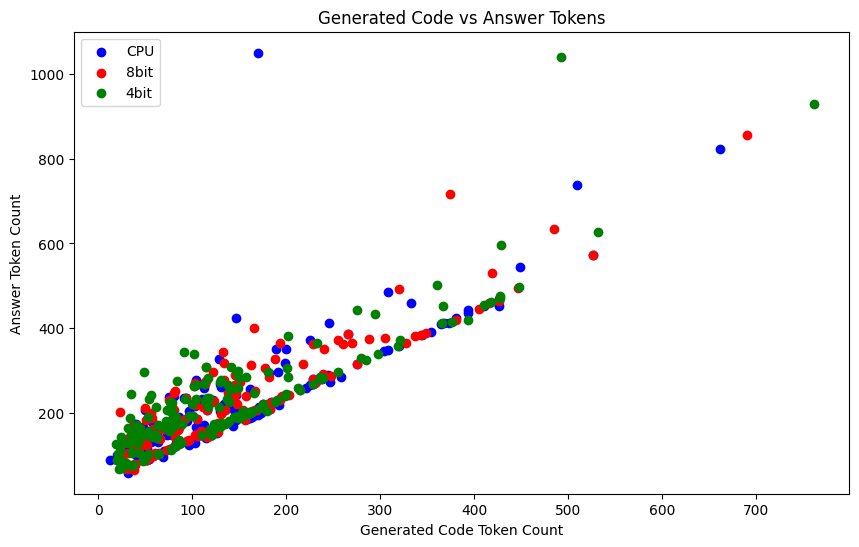
This shows that, in some cases, the model gets a bit more chatty, but mostly it just sticks to the code and gives a few words to go with that order. My parsed code did not always include the generated tests, which might also offset the ratio.
Conclusion
The Hugging Face blog post on StarCoder also discusses their results on the Human Eval dataset, as well as another dataset. Their results are a little better than mine, which might be due to using the StarCoder model vs StarChat model, and my parsing of the StarChat output was also quite simple. So I don’t see my article as exact evidence of a specific model’s capabilities, but rather a study on how I could run such a model (StarChat 16B) on consumer hardware and do some basic evaluation on the different configurations/models. Of course, similar experiments should also work for other hardware and models and might be of interest if considering tradeoffs in different models and configurations.
After initial issues to get everything running in a Docker container, it was not too difficult to get all this working. Hugging Face has made an easy-to-use framework and good documentation/examples.
The quantizations seem to have some effect on model performance, but on the other hand, they enabled me to run massive models on a desktop PC. They produced relatively small compromises in accuracy and large speed gains in inference time (on GPU vs CPU). In contrast to smaller models, I would likely still get good gains in accuracy compared to what I could run on this hardware. But that would be another interesting study — to compare quantized bigger models vs smaller models with full weights.
Since this was more of a study based on personal interests, I did not evaluate the model outputs in detail. In a more production-like or critical environment, I would evaluate the outputs, reasons for errors, prompting effects, and other properties in much more detail.
As noted in my brief look, adding “ import math” already fixed two of the failed cases, and in the Hugging Face StarCoder post, they list much better gains by prompt tuning. In the OpenAI evaluation, the 100 repeats with higher temperature parameters gave very good results. These are some properties to consider for using such models in practice for different use cases.
Originally published at http://teemukanstren.com on August 3, 2023.
LLM at Home was originally published in Better Programming on Medium, where people are continuing the conversation by highlighting and responding to this story.