Starting a SaaS app and need to set your users up with premium features? Here’s how to get started.

Earlier this year I released an AI-powered fitness app focused on creating tailored workouts using equipment you have at your disposal. It was pretty good, but inadvertently was geared toward how I exercise. Not great for general usage.
So I completely rewrote it for a hackathon. I took the best ideas I had and rebuilt it from the ground up. I generalized the app, made it multi-tenanted, and took out the features that were only relevant to me.
That worked.
Within the first three weeks, I had 70 users and blew past my OpenAI spending limit. I had to think of something quickly to prevent devastating service disruptions.
I landed on a subscription model strictly to cover the cost of my OpenAI bill. Free tier members get previously generated workouts for the muscle group and skill level they need and pro members get the original level of service — fresh, AI-generated workouts that meet their skill level, available equipment, and time requirements — for only $7 a month (not too bad if you ask me).
When I started implementing the subscription logic in the app I realized there was WAY more to it than I had originally thought. So we’re here together to work through the details to get you going with as little friction as possible.
Payment Processing
First things first, you have to choose a vendor for your payment processing. I don’t recommend trying to build all the payment management yourself.
Nothing leads to greater conversion loss than a shady payment gateway.
You could have the best service in the world, but if you have a payment gateway that leaves people feeling uncomfortable, you’ll lose them. Not only that, but you have PCI compliance you would need to deal with and a slew of other things that are handled for you with a payment vendor like Stripe, Square, or PayPal.
The undifferentiated heavy lifting of collecting payments and managing monthly subscriptions is done by these vendors so you can focus on business value. It’s worth every cent (trust me).
Since Stripe has best-in-class developer documentation, they’re my go-to for something like this. So let’s walk through the pieces of managing subscriptions using them.
Customer Creation
My app is built in AWS using Cognito as the user store and auth mechanism. When a user signs up, they are added to my identity pool and assigned a user id known as a sub (stands for subject). To set up billing in Stripe, I need to create a customer in my account that maps to my Cognito user. To do this, I use a PostConfirmation trigger to execute a Lambda function when a user initially signs up.
This Lambda function is responsible for creating the customer in Stripe and relating the Cognito user and Stripe id together.
const saveProfileRecord = async (userId) => {
  const customerId = await getPaymentId(userId);
  await ddb.send(new PutItemCommand({
    TableName: process.env.TABLE_NAME,
    Item: marshall({
      pk: userId,
      sk: 'user',
      signUpDate: new Date().toISOString(),
      customerId,
      subscription: {
        level: 'free'
      }
    })
  }));
};

const getPaymentId = async (userId) => {
  const stripeApiKey = await getSecret('stripe');
  const stripe = new Stripe(stripeApiKey);
  const customer = await stripe.customers.create({
    description: 'Fitness App customer',
    metadata: {
      userId
    }
  });

  return customer.id;
};
Here the provided userId is the Cognito sub. So we’re saving a record in DynamoDB that uses the sub as the partition key and includes customerId as a GSI hash key. We’re also saving the sub as metadata on the user record in Stripe for cross-reference purposes. Now when a new user signs up for our app, we have metadata on them and a Stripe customer id created!
Creating Subscriptions
Implementation details vary wildly based on your tech stack, your subscription model, programming language, etc…I won’t try to offer prescriptive guidance on saving your subscriptions in Stripe, but I will offer a couple of recommendations.
When possible, use their hosted components. At the time of writing, Stripe has a beta program that offers hosted checkout components. You can customize colors, branding, and subscriptions available in the Stripe dashboard, then simply drop a generated component in your app. This would be my first choice if you get accepted to the beta program. It will handle the resiliency, retry logic, checkout sessions, and API calls for you with little effort on your part. Pretty cool!
If you wish to build it yourself, Stripe has front-end and back-end template code to get you launched quickly. My biggest recommendation for you if you go this route is to make sure you’re making idempotent calls to avoid creating multiple subscriptions or charging somebody more than once. Nobody wants that.
Make sure you use the customer id you set up for your users when they were created so you can link your app users with the appropriate subscription.
Responding to Subscriptions
Stripe is the source of truth for subscriptions. When one is added/updated/deleted, we need to respond inside of our application. To do this, we’ll take advantage of Stripe’s webhook functionality. After successful modification of a subscription, Stripe will send the high-level details of the transaction in an event to a URL we provide.
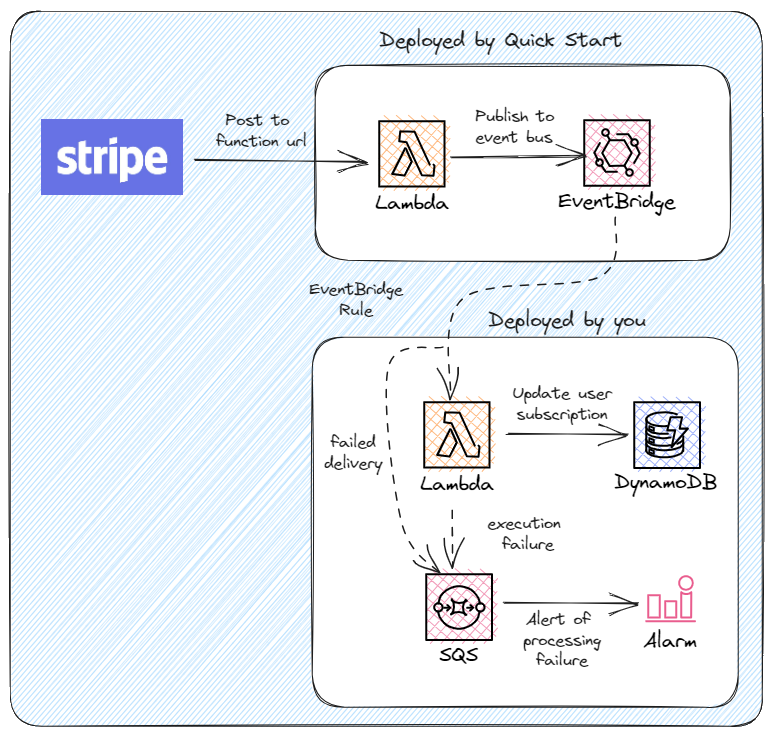
Luckily for us, there’s an EventBridge Quick Start provided by AWS to get us going quickly. We create a webhook in the Stripe dashboard, deploy the EventBridge Quick Start, then update the webhook in Stripe with the output from the Quick Start.
When using a Quick Start in AWS, you deploy a CloudFormation stack from the vendor (in this case, Stripe). This deploys a minimal set of resources that create a Lambda function and function URL that receives the webhook event. The function will validate the event signature and verify the payload is legitimate before transforming the payload into an event in EventBridge.

Once we have the webhook created in Stripe and Quick Start deployed into our AWS account, we can create a Lambda function to respond to the event via EventBridge. In SAM, that might look like this:
HandleSubscriptionEventFunction:
  Type: AWS::Serverless::Function
  Properties:
    CodeUri: functions/handle-subscription-event
    Policies:
      - AWSLambdaBasicExecutionRole
      - Version: 2012-10-17
        Statement:
          - Effect: Allow
            Action: dynamodb:UpdateItem
            Resource: !GetAtt FitnessTable.Arn
    Events:
      PaymentEvent:
        Type: EventBridgeRule
        Properties:
          EventBusName: !Ref FitnessEventBus
          Pattern:
            source:
              - stripe.com
You can see that our Lambda trigger is an EventBridge event from stripe.com. From here the implementation is yours. You can choose to put the user in a Cognito user group matching the subscription they just purchased. You could also update the user metadata record in DynamoDB with the subscription information. Or you could do both! Just remember the more options you choose, the more data you have to keep in sync.
If you structure your user metadata record to include the Stripe customer id as either the partition key or hash key of a GSI, you can access the user via the event payload that comes in from EventBridge. Here’s how we can update the customer record in DynamoDB when a new subscription is created.
exports.handler = async (event) => {
  const customerId = event.detail.data.object.customer;
  if(event['detail-type'] !== 'customer.subscription.created') {
    return;
  }

try {
  const response = await ddb.send(new QueryCommand({
    TableName: process.env.TABLE_NAME,
    IndexName: 'customers',
    KeyConditionExpression: 'customerId = :customerId',
    ExpressionAttributeValues: marshall({
      ':customerId': customerId
    }),
    Limit: 1
  }));

  if(!response.Items.length){
    console.error({error: 'Could not find customer', id: customerId });
    return;
  }

  const user = unmarshall(response.Items[0]);
  await ddb.send(new UpdateItemCommand({
    TableName: process.env.TABLE_NAME,
    Key: marshall({
      pk: user.pk,
      sk: user.sk
    }),
    UpdateExpression: 'SET subscription = :subscription',
    ExpressionAttributeValues: marshall({
      ':subscription': {
        level: event.detail.data.object.plan.product,
        startDate: event.detail.data.object.start_date
      }
    })
  }));
  } catch(err){
    console.error(err);
    throw err;
  }
}
The code above saves the “level” aka subscription plan to the user record. It also saves the start date for historical purposes. If an error occurs during the save of the data, we rely on the retry mechanism from EventBridge to back off and try again.
Of course, this isn’t the only event you’ll want to handle with subscriptions. Stripe offers created, deleted, paused, resumed, and updated events for subscriptions which you’ll need to account for in your application. You don’t want to accidentally offer premium features if someone cancels their plan!
Since network errors and outages happen, it’s also good to have a syncing mechanism between Stripe and your application. Once a day, you can trigger a job that queries Stripe and cross-references users in your application to make sure everybody is getting the features they are paying for. The frequency can be as often as you like but make sure not to wait too long!
What Next?
The next part of implementing subscriptions in your app is completely up to you. You’ve created your customers, managed your subscriptions, and synced your user metadata with Stripe, now you have to use that data. Since every app is different, I can’t offer guidance on what to do next. But I can give you a reference point.
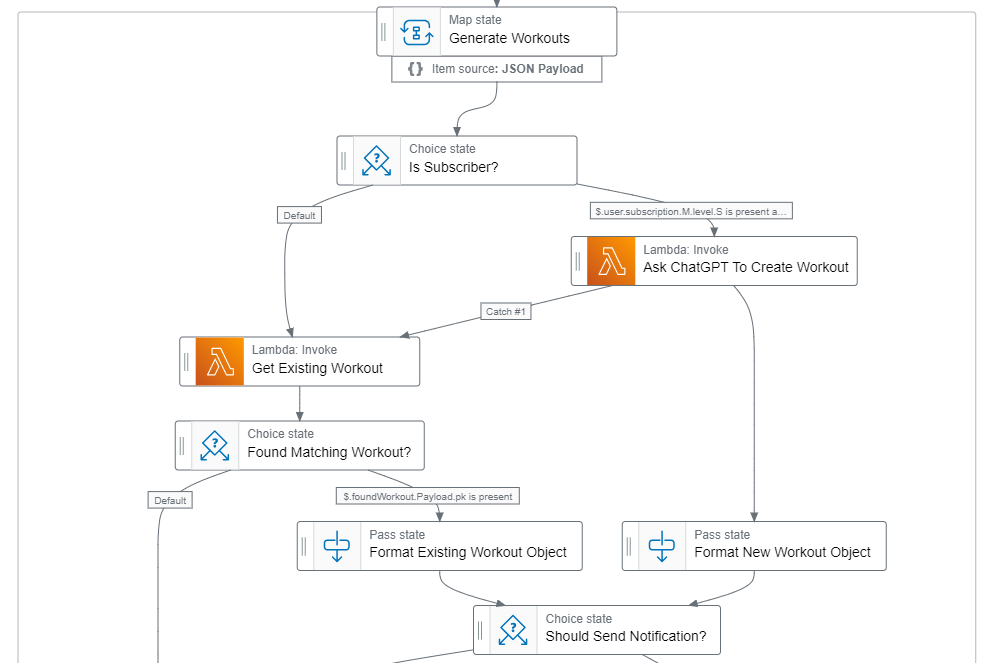
In my fitness app, premium users get access to custom workouts generated by OpenAI. In my Step Function workflow that creates weekly workout schedules, I check the subscription level of every user and add a logic branch based on their subscription level. If they are a free user, the workflow will pull from a cache of existing workouts. If they are premium, then their data is passed to OpenAI to build the custom workouts.

As much as I’d like to think everyone uses Step Functions over Lambda, I know that’s not the case. If you were writing your business logic in code, be it in a Lambda function or container, you’d still have logic trees split on the user subscription.
Summary
That’s it! That might feel like a lot to some and like a measly amount to others. But to summarize, here are the steps you need to take to implement Stripe subscriptions into your SaaS application:
- Create customers in Stripe that map 1-to-1 with your app users
- Post subscriptions from your app either via a hosted component or through the Stripe API being sure to make idempotent requests
- Run the EventBridge Quick Start for Stripe in your AWS account and configure a Stripe webhook to look at the created function url
- Add an event handler to sync app users with Stripe subscriptions
- (Optional) Create a recurring job that syncs Stripe with your app
- Serve subscription-specific features based on user records
I hope this clarifies the plan of attack for you. Building an app can be daunting, especially by yourself, and double especially when you’re handling money. Since implementation details vary greatly from app to app, prescriptive guidance can be difficult. That said, the overarching components are the same and you now should have a good idea of how to approach it.
Good luck and may your app be a resounding success!
Happy coding!
How to Process Stripe Subscriptions In Your Serverless Apps was originally published in Better Programming on Medium, where people are continuing the conversation by highlighting and responding to this story.