GenAI Playground: Image-to-Image Stable Diffusion With Runway ML’s v1–5 and Stability AI’s v2–1 on the Latest Intel GPU
Stable Diffusion models have become a great way for creators, artists, and designers to quickly prototype visual ideas without hiring outside help. If you have ever used a Stable Diffusion model, you might be familiar with giving a text prompt to generate an image.
Some models allow for a text prompt and an image as a starting point to generate an image. In this article, I’ll show how I ran a prediction of image-to-image Stable Diffusion models on Intel’s just-released Intel® Data Center GPU Max 1100.
I ran two different SD models for image-to-image generation. Both were hosted on Hugging Face. Though the models are used primarily for text-to-image, they both work on image-to-image as well:
Stability AI Stable Diffusion v2–1 Model
The Stability AI Stable Diffusion v2–1 model was trained on an impressive cluster of 32 x 8 x A100 GPUs (256 GPU cards total). It was fine-tuned from their Stable Diffusion v2 model.
The original dataset was a subset of the LAION-5B dataset, created by the DeepFloyd team at Stability AI. The LAION-5B dataset is the largest text-image pair dataset to date as of the time of writing, with over 5.85 billion text-image pairs. Figure 4 shows a few samples from the dataset.

The sample images shown reveal that the original images come in various pixel sizes; however, training these models in practice usually involves padding or resizing the images to have a consistent pixel size for the model architecture.
The breakdown of the dataset is as follows:
- laion2B-en: 2.32 billion text-image pairs in English
- laion2B-multi: 2.26 billion text-image pairs from 100+ other languages
- laion1B-nolang 1.27 billion text-image pairs with an undetectable language
Tracing the path of training these models is a bit convoluted, but here is the full story:
- Stable Diffusion 2-Base was trained from scratch for 550K steps on 256×256 pixel images, filtered for pornographic material, and then trained for 850K more steps on 512×512 pixel images.
- Stable Diffusion v2 picks up training where Stable Diffusion 2-Base left off and was trained for 150K more steps on 512×512 pixel images, followed by 140K more steps on 768×768 pixel images.
- Stability AI Stable Diffusion v2–1 was further fine-tuned from Stable Diffusion v2 first with 55K steps followed by 155K steps with two different explicit material filters.
More details on the training can be found on the Stability AI Stable Diffusion v2–1 Hugging Face model card here. I wanted to mention that I have repeated this description from a previous article on text-to-image Stable Diffusion, as it is the same model.
Runway ML Stable Diffusion v1–5 Model
The Runway ML model was fine-tuned from the previously described Stability AI v2–1 model. It was trained for an additional 595k steps at a resolution of 512×512. One of its advantages is that it is relatively lightweight: “With its 860M UNet and 123M text encoder, the model is relatively lightweight and runs on a GPU with at least 10 GB VRAM.” The Max 1100 GPU has 48 GB of VRAM, so it is plenty for this model.
The Intel GPU hardware
As I mentioned, the GPU I used for my inference test is the Intel Data Center GPU Max 1100, which has 48 GB of memory, 56 Xe-cores, and 300 W of Thermal Design Power.
On the command line, I can first verify that I indeed do have the GPUs that I expect by running:
clinfo -l
And I get an output showing that I have access to four Intel GPUs on the current node:
Platform #0: Intel(R) OpenCL Graphics
 +-- Device #0: Intel(R) Data Center GPU Max 1100
 +-- Device #1: Intel(R) Data Center GPU Max 1100
 +-- Device #2: Intel(R) Data Center GPU Max 1100
 `-- Device #3: Intel(R) Data Center GPU Max 1100
Similar to the nvidia-smi function, you can run the xpu-smi in the command line with a few options selected to get the statistics you want on GPU usage.
xpu-smi dump -d 0 -m 0,5,18
The result is a printout of important GPU utilization for the device 0, every second:
getpwuid error: Success
Timestamp, DeviceId, GPU Utilization (%), GPU Memory Utilization (%), GPU Memory Used (MiB)
13:34:51.000,    0, 0.02, 0.05, 28.75
13:34:52.000,    0, 0.00, 0.05, 28.75
13:34:53.000,    0, 0.00, 0.05, 28.75
13:34:54.000,    0, 0.00, 0.05, 28.75
Run the Stable Diffusion Image-To-Image Examples Yourself
My colleague, Rahul Nair, wrote the Stable Diffusion image-to-image Jupyter notebook hosted directly on the Intel Developer Cloud. It gives you the option of using either model I outlined earlier. Here are the steps you can take to get started:
- Register for the Intel Developer Cloud as a Standard user here.
- Head over to the Training and Workshops section once you are logged in.
- Click on the GenAI Launch Jupyter Notebook option, and you can find the text-to-image Stable Diffusion notebook and run it there.
In the notebook, to speed up inference, the Intel® Extension for PyTorch* was used. One of the key functions is _optimize_pipeline where ipex.optimize is called to optimize the DiffusionPipeline object.
    def _optimize_pipeline(
        self, pipeline: StableDiffusionImg2ImgPipeline
    ) -> StableDiffusionImg2ImgPipeline:
        """
        Optimize the pipeline of the model.

        Args:
            pipeline (StableDiffusionImg2ImgPipeline): The pipeline to optimize.

        Returns:
            StableDiffusionImg2ImgPipeline: The optimized pipeline.
        """
        for attr in dir(pipeline):
            if isinstance(getattr(pipeline, attr), nn.Module):
                setattr(
                    pipeline,
                    attr,
                    ipex.optimize(
                        getattr(pipeline, attr).eval(),
                        dtype=pipeline.text_encoder.dtype,
                        inplace=True,
                    ),
                )
        return pipeline
Figure 5 shows the handy mini user interface within the Jupyter Notebook itself for image-to-image generation. Select one of the models, enter the desired image URL, enter a prompt, select the number of images to generate, and you’re off to creating your own images.

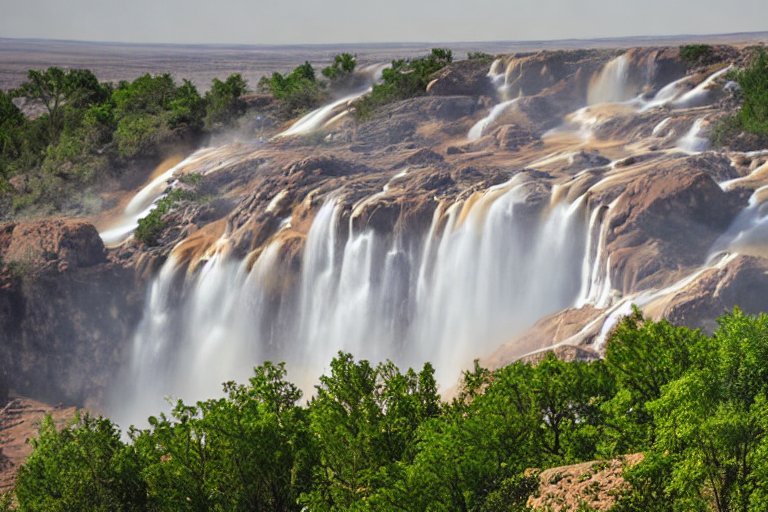
Figures 1 and 2 show results samples with entirely new images from text + image prompts that I ran with this Intel GPU. I thought it was neat to start with a real Earth nature photo of a waterfall, tell it to make a “Mars waterfall,” and see the adaptation to a red-colored landscape (Figure 1).
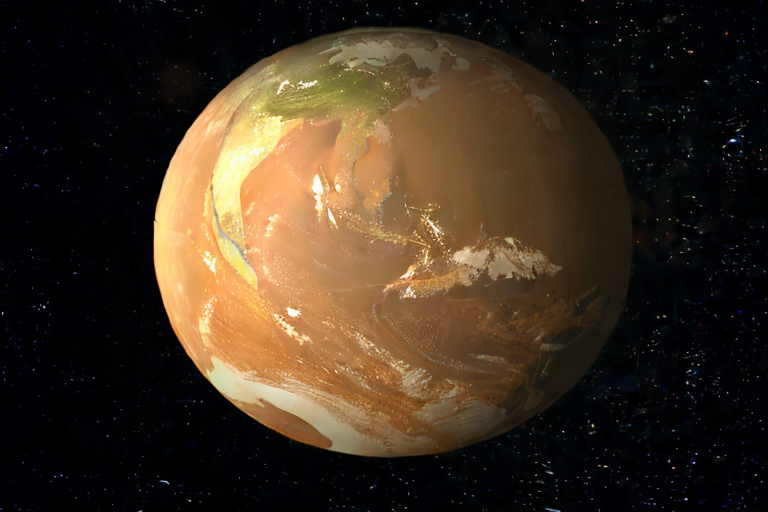
Then, in Figure 2, the model transformed an image of Jupiter to have some Earth continental structure but still colored red with some of the distinctive features of Jupiter left over.
I could generate these images through the notebook, and inference runs in seconds. Please share your images with me over socials by connecting with me below. Also, please let me know if you have any questions or would like help getting started with trying out Stable Diffusion.
Disclaimer for Using Stable Diffusion Models
The Stable Diffusion models are powerful tools for high-resolution image synthesis, including text-to-image and image-to-image transformations. While they are designed to produce high-quality results, users should be aware of potential limitations:
- Quality variation: The quality of generated images may vary based on the complexity of the input text or image and the alignment with the model’s training data.
- Licensing and usage constraints: Please carefully review the licensing information associated with each model to ensure compliance with all terms and conditions.
- Ethical considerations: Consider the ethical implications of the generated content, especially in contexts that may involve sensitive or controversial subjects.
For detailed information on each model’s capabilities, limitations, and best practices, please refer to the respective model cards.
References
- Intel® Data Center GPU Max 1100
- laion2B-en
- laion2B-multi
- laion1B-nolang
- Intel Developer Cloud
- Intel® Extension for PyTorch*
Thank you for reading. Happy coding!
Want to connect?
You can reach me at
- Intel DevHub Discord server (username bconsolvo)
GenAI Playground: Image-to-Image Stable Diffusion With Runway ML’s v1–5 and Stability AI’s v2–1 on… was originally published in Better Programming on Medium, where people are continuing the conversation by highlighting and responding to this story.