
If you read my previous article, you know that I have a Bostonian version of ChatGPT in Slack called W’kid Smaaht (“wicked smart”). My team lives in Slack, so it makes sense to have an AI bot in there, too. You can install W’kid Smaaht yourself… and change the personality if you’re not a Boston fan.
For this exercise, I wanted to add a feature every sizable company needs: employee search by skill. This also seemed like a good way to learn more about Retrieval Augmented Generation (RAG).
The easiest MVP I could think of was to scrape our public-facing website for employee bios, chunk, store, and create a conversational agent. My goal was to get to WOW as quickly as possible and not worry about getting everything perfect.
Step 1 — Have GPT Write Some Code
Why code a screen scraper when GPT can do it for me? All it took was a few DMs to my AI friend. Here are some screenshots of the chats with the final script at the end:

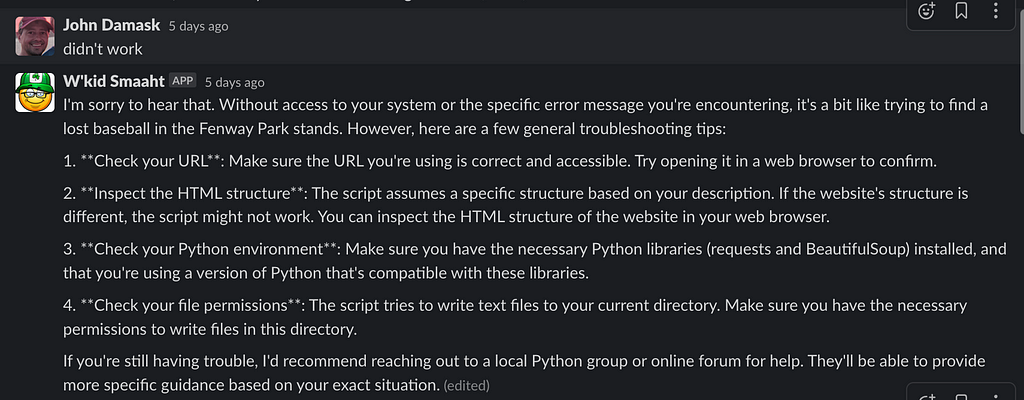
This worked, but it didn’t extract the right content.

Problem. Complain to GPT.
#2 was a good idea: “Inspect the HTML structure,” so I gave GPT some extra intel.
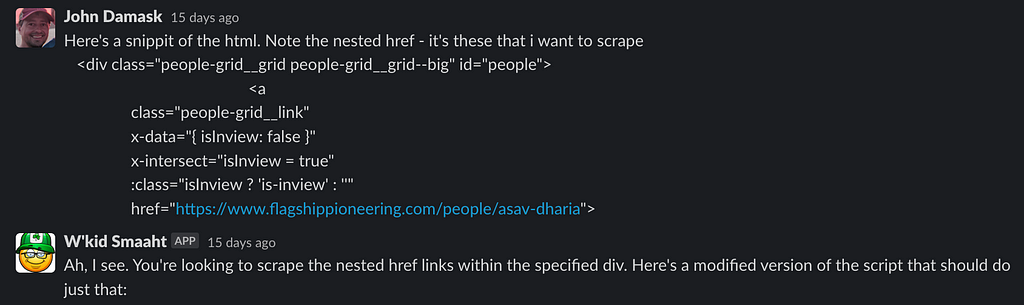
It works. Nice. But I just want biography text. Ask W’kid Smaaht to extract just the text in a particular div tag.

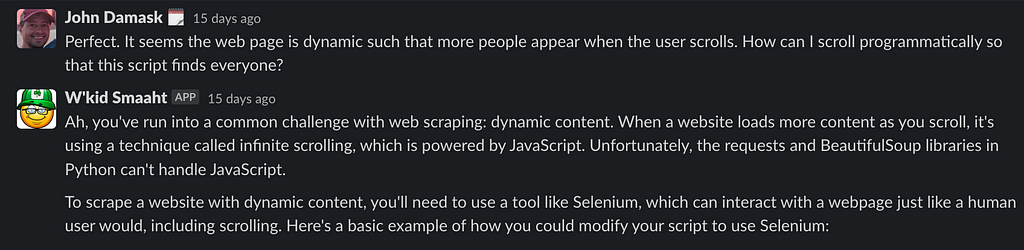
Cool, but I only get a dozen or so text files. Why? Ah, the website has an infinite scroll. How do I deal with that?
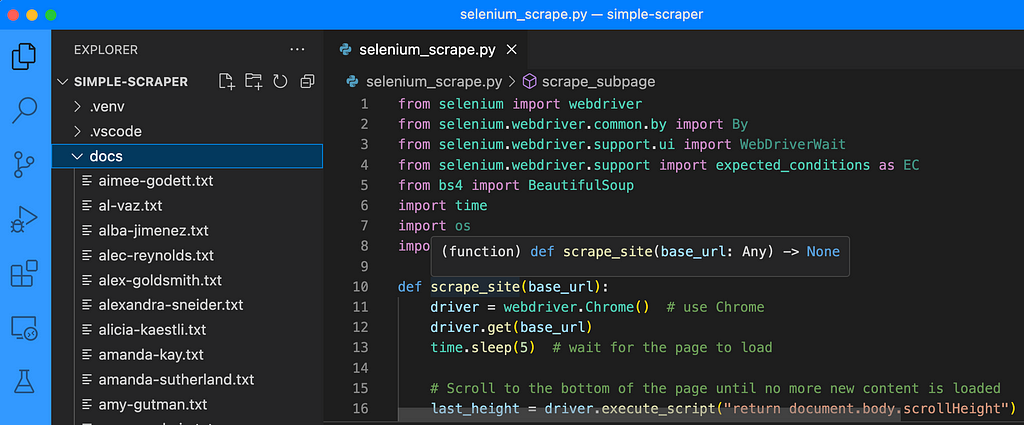
And here’s the code:
from selenium import webdriver
from selenium.webdriver.common.by import By
from selenium.webdriver.support.ui import WebDriverWait
from selenium.webdriver.support import expected_conditions as EC
from bs4 import BeautifulSoup
import time
import os
import requests

def scrape_site(base_url):
    driver = webdriver.Chrome()  # use Chrome
    driver.get(base_url)
    time.sleep(5)  # wait for the page to load

    # Scroll to the bottom of the page until no more new content is loaded
    last_height = driver.execute_script("return document.body.scrollHeight")
    while True:
        driver.execute_script("window.scrollTo(0, document.body.scrollHeight);")
        time.sleep(2)  # wait for new content to load
        new_height = driver.execute_script("return document.body.scrollHeight")
        if new_height == last_height:
            break
        last_height = new_height

    soup = BeautifulSoup(driver.page_source, 'html.parser')
    people_grid = soup.find('div', {'class': 'people-grid__grid people-grid__grid--big', 'id': 'people'})
    for link in people_grid.find_all('a', {'class': 'people-grid__link'}):
        url = link.get('href')
        if url and url.startswith('http'):
            scrape_subpage(url)

    driver.quit()

def scrape_subpage(url):
    response = requests.get(url)
    soup = BeautifulSoup(response.text, 'html.parser')
    text_div = soup.find('div', {'class': 'redactor redactor--dropcap'})
    if text_div:
        text = text_div.get_text(strip=True)
        page_name = url.split('/')[-1]
        name = ' '.join(word.capitalize() for word in page_name.split('-'))
        with open(f'docs/{page_name}.txt', 'w') as f:
            s = f"{name}. {text}"
            f.write(s)

base_url = 'https://www.flagshippioneering.com/people/directory'  # replace with your URL
scrape_site(base_url)
I saved the code as selenium_scrape.py, created a venv, pip installed libs, installed chromedriver, and let it rip. The code worked fine out of the box, creating a separate file for each employee with their bios pulled from the website.
Step 2 — Chunk, Create Embeddings and Store
The next piece was to chunk bios and load them into a vector store (database). But I never used a vector store before, so I didn’t know what I didn’t know. The good news is we’re in the era of just-in-time learning, and learning the essentials didn’t take long.
You can find lots of online tutorials about vector stores, so this article won’t repeat the reasons to use one. Just know they’re useful when looking for information semantically similar to a given search term. For example, querying with the term “biology” may return records for “molecular biology,” “biochemistry,” etc.
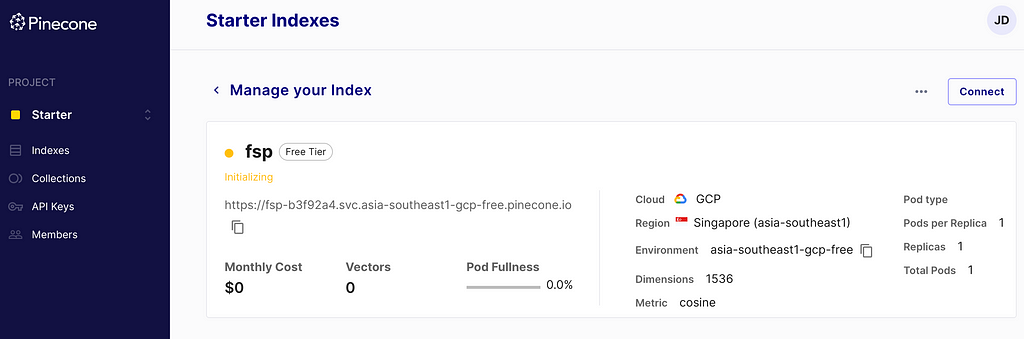
LangChain has a great primer on vector stores and supports several of the most popular ones. I chose Pinecone because I wanted a SaaS (not a local or in-memory store) that was easy to use and free for an MVP.
After signing up, I started to create an index and was immediately stumped; how many dimensions does this need? It turns out that the answer comes from OpenAI’s embedding model — 1536. There are surely other considerations, but this was enough to keep moving forward.
Great. I have content and vector store. How do I load the data?
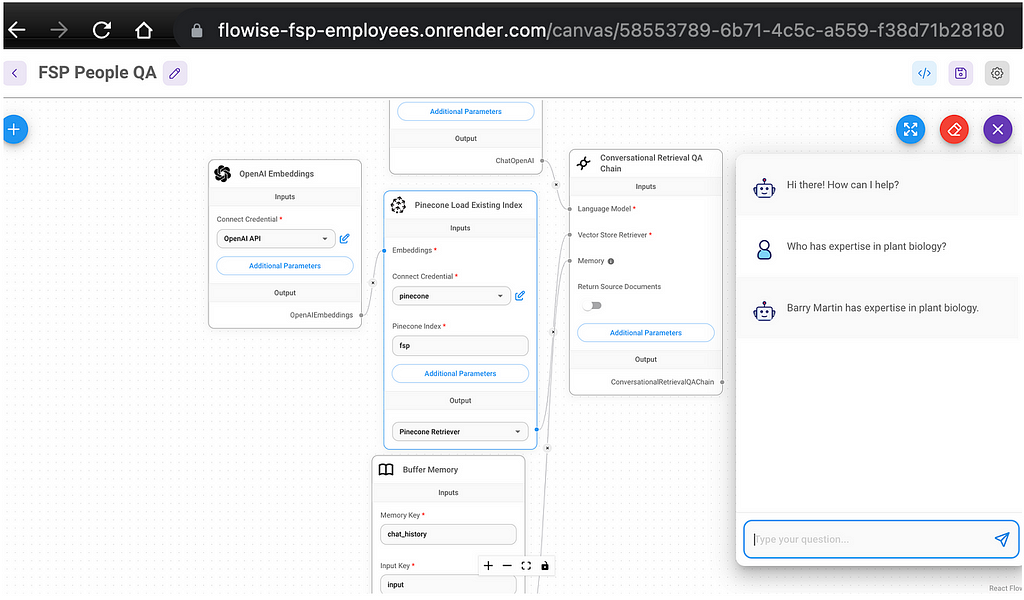
Enter Flowise
When searching LangChain tutorials, I came across Leon van Zyl’s fantastic video series about Flowise, a no-code tool to create LLM apps that embeds many LangChain features. Following the videos and Flowise’s examples, I was able to create a Pinecone loader and a chatbot for interacting with my data in under an hour. And even better, seeing how the various components were strung together helped me understand LangChain a bit more.
Getting started was as simple as forking Flowise, cloning it, and configuring it per the README.
Loader
To load the docs, I created a Flowise “chat flow” by following Leon’s tutorial and tweaking things along the way.

You can see how conceptually simple this is. Iterate over files in a folder, read and split according to some rules, create embeddings for each, and upsert.
In this flow, a chat triggers the load — which is a weird UX — but whatever, MVPs are about getting something working fast, not elegance. Bios for ~300 people were processed in a few minutes.
Step 3 — Make the Search App
We want to make a separate flow for the employee search since this is a load-once, query-many design. If these were combined into a single flow, each session would trigger a reload of all the data.
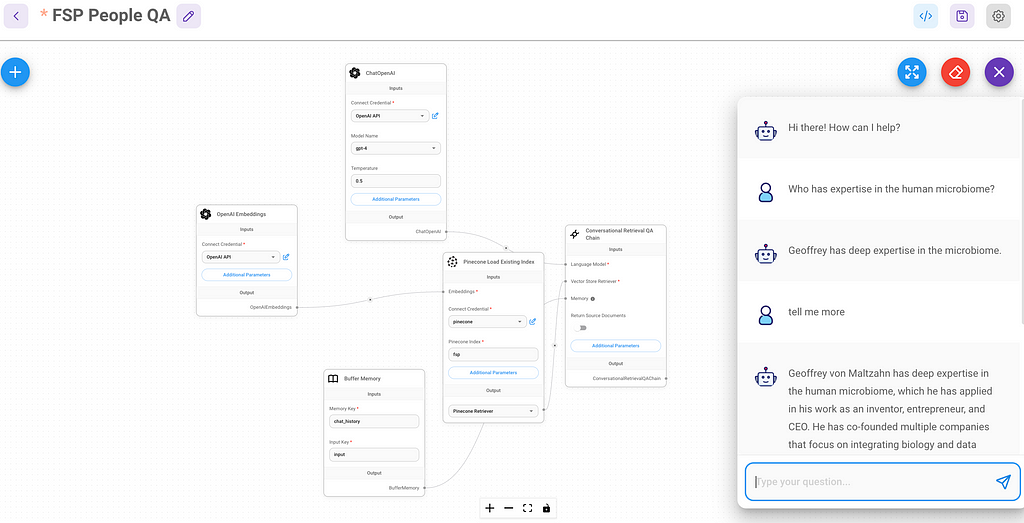
This could hardly have been easier.
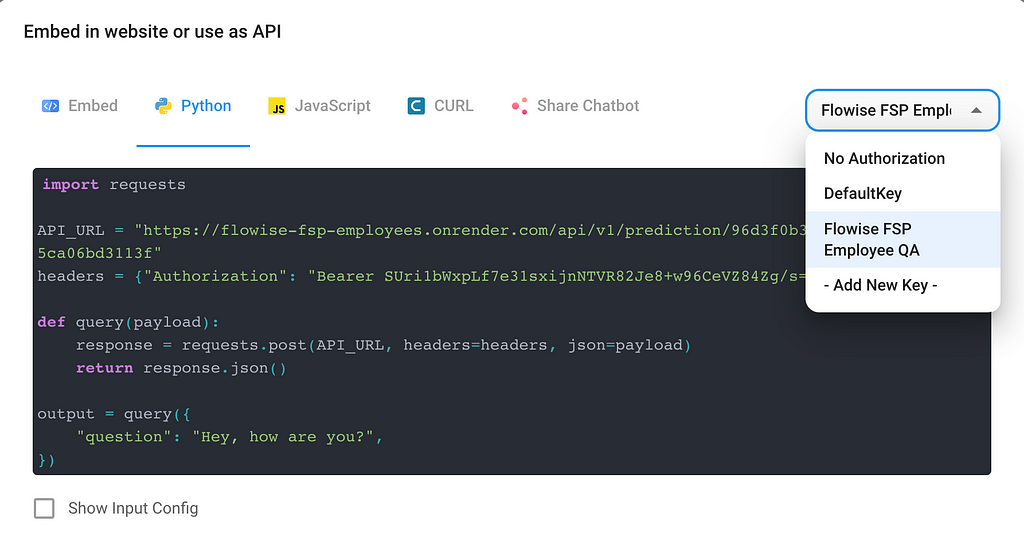
Step 4 — Expose App as an API
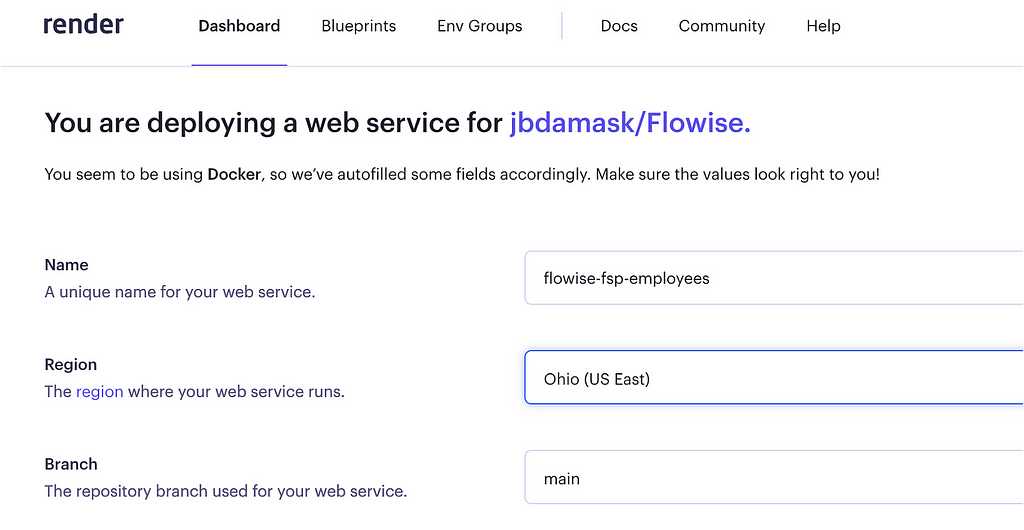
Now what? Flowise runs on my Mac, but I need it on a web server. Ideally, this would be a docker container running in the same AWS account as W’kid Smaaht, but Flowise doesn’t have ECS deployment documented yet, so I went with a simpler solution. Render.
Leon’s Flowise AI Tutorial #5 — Deploying to Render got me where I needed to go. After setting up my free Render account and configuring the basics, I connected it to my forked Flowise repo and created a new Render web service (Node).
After about ten minutes or so, the service was live.
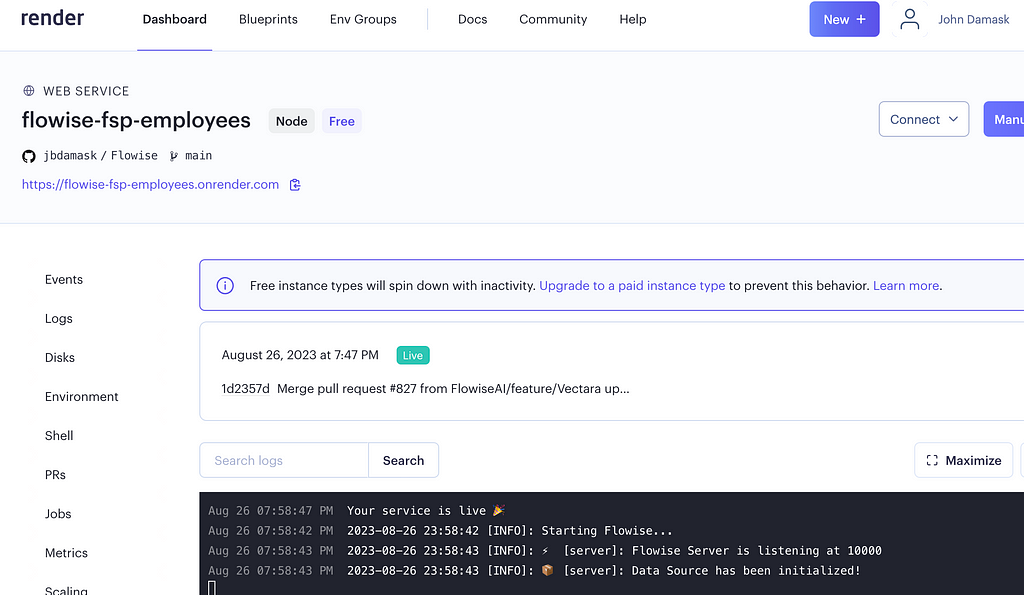
What just happened? A bunch of stuff. But I didn’t need to know about most of it. Render created the infrastructure, installed Flowise, and exposed it behind a public URL. Now, I can access Flowise via Render just like I did on my laptop.
Next, I exported my local version of the FSP People QA chat flow and imported it into Flowise, running on Render. The API keys don’t copy over when you export/import a single chat flow, so I recreated the OpenAI API and Pinecone credentials in my Render Flowise and added them to the chat flow.
Success!
API
But I don’t want a web GUI for this; I want an API. To do that, I followed another tutorial by Leon on using Flowise endpoints.
It was easy to secure the endpoint with a new key and grab the handy reference Python code to add to my app. To see the entire function, check out the localsrc/utils.py file in the 17-add-flowise-fsp-emp-directory-api-calls branch from W’kid Smaaht.
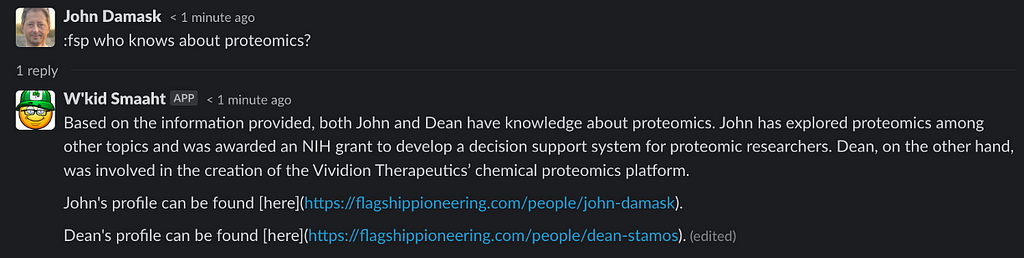
To test it, I added a little hook to look for messages that start with “:fsp” and pass the input to the API.
So, is W’kid Smaaht any smarter? Yep.

Nice. But it’s not very useful. Unless we know John and Dean, we really don’t get enough info to help us meaningfully. It would be better if this included a link to their bio pages.
It turns out that this can be done by enabling the “Return Source Documents” option in the chat flow’s Conversational Retrieval QA Chain widget and parsing the metadata.
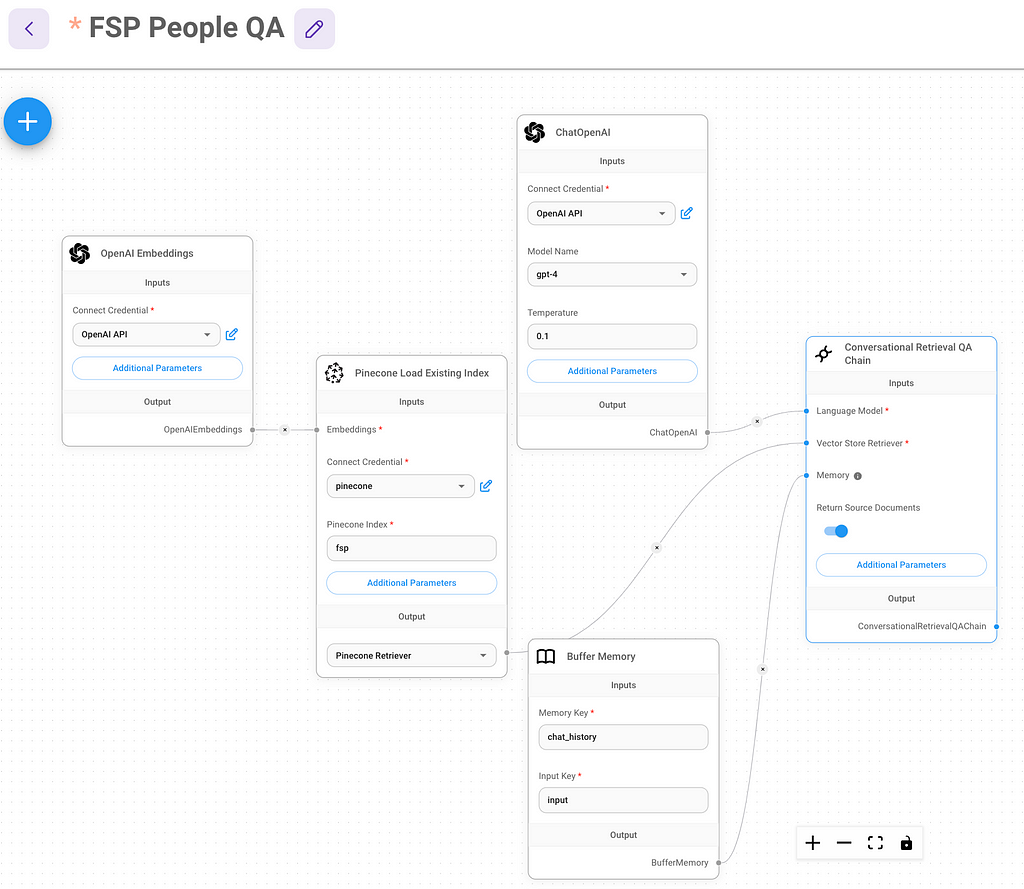
Once enabled, I checked out the object structure in my debugger to learn which field contained the source. But wait… the source is the file that was chunked and uploaded to Pinecone. I need a URL.
![Debugger inspecting the sourceDocuments object returned by my Flowsise people search. The sourceDocuments[0].metadata.source field holds the file path of the source document I loaded into Pinecone](https://cdn-images-1.medium.com/max/1024/1*iEO4dHkSBFMS0PPryOqv-Q.png)
This is easy enough to adjust. Since we know that the filename was taken from the page URL, we can just convert it back. Simply split the ‘source’ string to grab the user name and append it to my company URL. Then, we can pass the modified list back to Slack along with the text response.
This is better but still a bit wonky. I would prefer if the hyperlinks were embedded in the string. But coding that logic isn’t straightforward because some bios include the person’s full name while others don’t. For example, Dr. Jane Doe may appear as “Dr. Jane Doe,” “Dr. Doe,” “Jane Doe,” or just “Jane” in the text. How should I solve this? Hmm….
Lol, hang on… what am I thinking? LLMs are great at this type of thing, and LangChain makes it easy with just a few lines of code.
Include the ChatPromptTemplate, SystemMessagePromptTemplate, and HumanMessagePromptTemplate in the following code:
from langchain.prompts import ChatPromptTemplate
from langchain.prompts.chat import SystemMessagePromptTemplate, HumanMessagePromptTemplate
Next, add prompt templates for system and human and craft their chat prompts. Notice the prompt specifies to return a string formatted according to Slack’s convention. This is because Slack’s way of encoding hyperlinks is unique.
    system_template = """You take a string and a python list of URLs
    and do your best to attach the URLs as hyperlinks to their
    proper locations in the string. The string return is the same as the text
    string that was provided to you, but with hyperlinks inserted into the right places.
    The string you return must have its hyperlinks formatted according to
    Slack convention.

    Example:
    <https://flagshippioneering.com/people/drew-dresser|Drew> and <https://flagshippioneering.com/people/sean-murphy|Sean>
    have experience with AWS
    """

    # create a prompt template for a System role
    system_message_prompt_template = SystemMessagePromptTemplate.from_template(
        system_template)

    # create a string template for a Human role with input variables
    human_template = "{text} {urls}"

    # create a prompt template for a Human role
    human_message_prompt_template = HumanMessagePromptTemplate.from_template(human_template)

    # create chat prompt template
    chat_prompt_template = ChatPromptTemplate.from_messages(
        [system_message_prompt_template, human_message_prompt_template])

    # generate a final prompt by passing variables (`text`,  `urls`)
    final_prompt = chat_prompt_template.format_prompt(text=rt, urls=sl).to_messages()
The last step is to make another call to OpenAI’s API to have the LLM reformat the string. For speed, and because this seems likely to be consistently right, I call gpt-3.5-turbo rather than gpt-4.
llm = ChatOpenAI(model_name='gpt-3.5-turbo', openai_api_key=OPENAI_API_KEY, streaming=False)
    response_string = llm(final_prompt)

    return response_string.content
Now the results are Slackified!
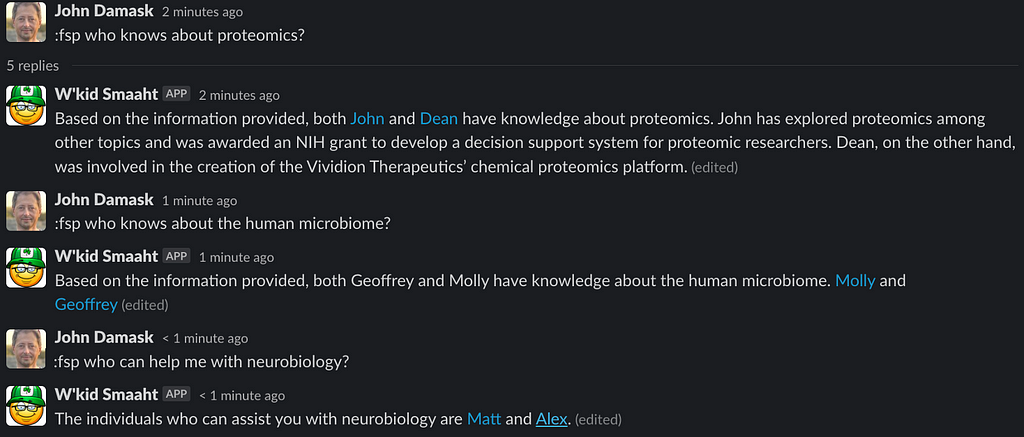
As you can see, the results aren’t always perfect but it really is good and certainly beats raw URLs.
It Ain’t Over Till It’s Prod
This was another experiment to get my feet wet with writing LLM applications. The toolset made it fast and fun, but the hard work actually starts now — there’s no way I’d put this into production as-is.
I haven’t shown the problems I had getting consistent and complete results from the vector store and GPT. Unlike traditional data applications, this felt a bit more like art than science, but I acknowledge that part of it is my lack of experience with them.
Also, responses from Pinecone and LLMs are not deterministic, so there’s a bunch of conditional and error logic that needs to be written, which can be a grind. But maybe I need to adjust my thinking from one of coding through problems to writing better prompts or using agents to do the reasoning for me. We’ll see.
Employee Search With OpenAI, Flowise, and LangChain was originally published in Better Programming on Medium, where people are continuing the conversation by highlighting and responding to this story.