This year I’ve been quite deep into the topic of generative AI, especially in terms of large language models. At some point, I felt like I needed to step back and return to more practical AI applications.
So I took part in a natural language processing Kaggle competition. My final score wasn’t that great, 1380th place out of 2061 competitors, but I pretty much developed the solution independently. And as someone whose main job is not being a data scientist, I’m quite proud of the results.
Basically, the competition’s goal was to find a good solution to automate the grading of students’ essays. Students were typically asked to read a reference text and write about it.
Now my solution can be found in GitHub, and my best performance pipeline did fine-tune a BART model. I was also very careful to not leak test data into the training, which can be seen in how by little the model loss increases between the public and private submissions:


However, my solution is not groundbreaking in the sense that it is not in the top range of performance, so I’ll not focus on explaining what I did in terms of modeling.
Instead, what was interesting is that this time I applied some basics of software/data engineering skills to the competition, namely:
- Created a simple DAG-like framework
- Defined tasks, pipelines, tables, etc
- Artifact management, packaging, and shipping source code as well as trained models to the Kaggle platform.
These things in conjunction, allowed me to develop locally with my GPU, and just submit a ready-to-use version of the inference code, along with a fine-tuned model.
This meant that the GPU quota in Kaggle was solely used for inference, and I rarely reached close to using the whole quota.
What I want to share is a bit about these software/data engineering techniques. I had already written an internal readme for the person that joined my Kaggle team to understand the codebase, which I named “Paolo’ Guide to the over-engineered Kaggle repository”, so I’ve simply adapted what I already had there for this article.
One final note: the code examples I share use scikit-learn, and are basically a baseline model/pipeline I’ve implemented before going into the deep learning one. If you’re interested in the code that uses hugging face and pytorch, do check the repository! Feel free to reach me out if you would like to discuss this solution, or have questions.
Graphs, Pipelines, Tasks and Context
When getting started with data engineering, one of the first topics that often pop up are frameworks that offer a direct acyclic graph (DAG) implementation of some sort for the programmer.
Famous examples that work offer this are airflow, and in the cloud world AWS State Machine (though here, technically a cycle is possible).
Commonly in the data engineering world, we call such a DAG that processes data a “data pipeline”, or just a “pipeline”. Additionally, it’s common to refer to a node in the DAG as a “ task”. It could be seen as a unit of work.
An example of an AWS state machine implementing a graph.
The basic idea behind these frameworks is orchestration. You can run a task in a place, say a web server, while another task uses an AWS Lambda and so on.
The second idea is fault recovery. When dealing with data, it’s especially hard to foresee all problems, so it’s very useful to be able to visualize the whole flow when debugging a weird problem. It’s also possible to restart the flow just from the failed component or add retry mechanisms.
The third advantage of this model is that it’s very easy to extend existing flows, as the frameworks force a certain degree of decoupling. Certain here, because context is still shared between nodes.
To understand context better, let’s consider, for instance, this DAG:
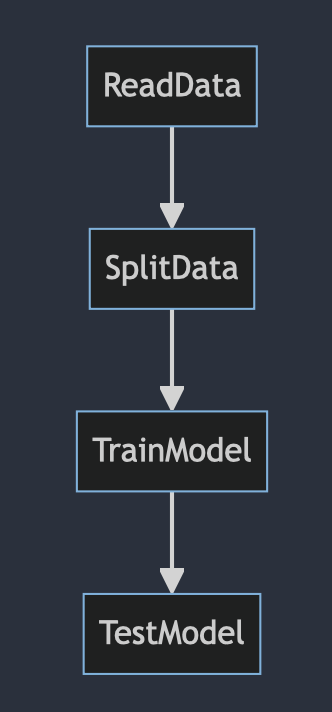
Obviously, SplitData depends on the input data, and TrainModel depends on the data that is already divided.
One way these frameworks implement context is by passing a dictionary that stores some sort of global state shared across all nodes of the graph.
As an example, a potential context for the above graph is this:
{}  -->
{"input_data": data_frame} -->
{"input_data": data_frame, "trained_model": model_obj} -->
...
How is this relevant to Machine Learning solutions?
When developing a machine learning model, one can leverage these frameworks, because the development process quite often is similar to a data pipeline. Except that you add models in the mix, which brings a few additional steps:
- Model training
- Model storage
- Model serving (inference)
There are other possible steps, like monitoring, label collection, and auto retraining, but these are the most fundamental ones to every AI solution.
Of course, when modeling a data scientist may just stick to a Jupyter notebook, and that’s fine. But once you take a model into a productive system, the code needs to exit that notebook and become part of an actual code base that is shipped somewhere (probably in the cloud).
Interestingly, one also finds specialized frameworks for machine learning pipelines (for instance kubeflow). In this case, the framework depends on Kubernetes, and is quite a stretch to use it locally.
How is this relevant to a Kaggle competition?
In Kaggle you still use a notebook to submit your solution, so why is this relevant? Well, it’s a matter of choice/preference.
I personally find it much more enjoyable developing code inside an IDE like VSCode, and testing my models through scripts locally than through a Jupyter notebook. Probably because I’m not a data scientist, and have instead a software engineering background.
There are also some clear advantages:
- Possibility to apply code formatters and liners, which are typically not possible in Kaggle (as far as I know).
- Possibility to split code into modules, increasing code reuse
Also, in my experience, all my machine learning projects become an absolute mess with time, even if I develop them locally. Take a look at this other GitHub repository from a previous competition to understand what I mean.
The same happened to me while in college. Unfortunately, though I seem to have lost access to my bit-bucket account where my machine learning repositories were stored, otherwise I’d have more examples to share.
So this time I decided to add some underlying structure before starting the actual model development, to see if it helps keep the code base manageable as the number of experiments grows over time.
Why yet another DAG framework? Why not <insert your own flavor here>?
There are two main reasons:
- This is a quite simple framework and we don’t need all the features offered by something like airflow.
- We need a custom deployment strategy, which is just easier to implement from scratch than figuring out how to hack something that’s supposed to run in the cloud or as a web server.
Remember: our target deployment is the Kaggle platform.
The Code README
From now on, we’ll look at particular code components, so it’s advised to look GitHub repository in case of interested in understanding something better.
If you want to execute the code, remember that before starting, you have to download the competition data and add it unzipped under data/input.
Note that this directory is not published to git.
Dependency management
We use poetry to track project dependencies, and build packages.
This is important as Kaggle competitions run without internet access, so we cannot reliably rely on pypi being available during the pipeline execution.
You’ll see the configuration for this in pyproject.toml. The resolved/pinned dependencies versions are stored in poetry.lock.
However, poetry falls short when installing packages from a specific index, so I had to define a requirements.txt file for the ones that depend on CUDA runtime.
If you’re not familiar with poetry, I suggest you skim over the documentation to understand it’s capabilities. One thing I like about it is that it also provides an auto managed virtualenv for you.
Git Hooks
These are defined (unsurprisingly) inside git-hooks.
Pre-commit
Every time you commit, this runs and checks that your source code conforms to the format standard and that no errors are detected by the linters.
Pre-push
Every time you push, this builds the current code as a Python package and uploads to Kaggle as a new dataset version.
The Kaggle dataset is defined in a file that is not committed to the repo currently. I place the dataset-metadata.jsoninside the dist directory that poetry uses for the packaged code.
{
  "title": "common-lit-pipelines",
  "id": "paolorechia/common-lit-pipelines",
  "licenses": [
    {
      "name": "CC0-1.0"
    }
  ]
}
Installing git hooks
To activate a git hook locally, you need to:
- copy the script from git-hooks into .git/hooks
- make sure it has no extension name, e.g., [pre-commit.sh](<http://pre-commit.sh>) must be named as pre-commit
- make sure it is executable (e.g., use chmod+x .git/hooks/pre-commit)
The entrypoint (main.py)
All code is executed through this file. It automatically finds the exposed pipelines and executes them according to the passed argument.
I typically run using this command using poetry run to use the auto-managed virtualenv. You can get help like this:
poetry run python [main.p](<http://main.py/>)y -h
It will print a nice help and show you the available pipelines.
usage: Pipeline executor [-h] pipeline_name

positional arguments:
  pipeline_name
options:
  -h, --help     show this help message and exit
Available pipelines: ['basic_train_linear_regressor', 'basic_predict_random_forest', 'basic_train_random_forest', 'explore_input_data',
'set_train_linear', 'set_train_random_forest', 'set_predict_random_forest', 'split_train_test', 'train_bart_regression',
'zero_train_random_forest']
So to run the first pipeline, you’d do:
poetry run python [main.py](<http://main.py>) basic_train_linear_regressor
The remaining of the code is inside common_lit_kaggle directory, which is packaged by poetry on the pre-push git hook. In the next sections, we’ll look at the structure for this part.
Pipelines
All the [main.py](<http://main.py>) does is inspect the common_lit_kaggle.pipelines.__init__.py, and find the exposed classes there.
So every time you add a new pipeline, make sure to include it in this file (common_lit_kaggle.pipelines.__init__.py). Today it looks like this:
from .pipeline_basic_linear_regressor import BasicLinearRegressorPipeline
from .pipeline_basic_random_forest import BasicRandomForestPipeline
from .pipeline_explore_data import ExploreDataPipeline
from .pipeline_predict_basic_random_forest import BasicPredictRandomForestPipeline
from .pipeline_predict_set_random_forest import (
    SentenceTransformersPredictRandomForestPipeline,
)
from .pipeline_set_linear_regression import SentenceTransformerLinearRegressionPipeline
from .pipeline_set_random_forest import SentenceTransformerRandomForestPipeline
from .pipeline_split_train_test import SplitTrainTestPipeline
from .pipeline_train_bart_regression import TrainBartRegressionPipeline
from .pipeline_zero_shot import ZeroShotRandomForestPipeline
It then calls Pipeline.run(). Let’s briefly look at the common_lit_kaggle.framework.pipeline.
💡 Everything inside common_lit_kaggle.framework is generic code that is widely reused throughout the repository. The other directories define specific instances that implement the framework code. You think of this as a mini library.
import logging
from typing import Iterable
from common_lit_kaggle.framework.task import Task

logger = logging.getLogger(__name__)

class Pipeline:

    def __init__(self, name: str, tasks: Iterable[Task]) -> None:
        self.name = name
        self.tasks = tasks

    def run(self):
        context = {}
        for task in self.tasks:
            logger.info("Starting task: %s", task)
            result = task.run(context)
            context.update(result)
Hopefully this code is self-explanatory. All it’s doing is it’s building a very simple DAG and passing context.
Tasks
Each node is unsurprisingly called a Task. A task must implement only one method: run. There’s where the context is injected by the pipeline and where write new code.
You can add new code in any structure you want, e.g., create new functions, methods or even entire new packages. In the end, though, you import these code components inside a new Task run method and add them to the pipeline.
from abc import abstractmethod
from typing import Any, Mapping, Optional

class Task:
    def __init__(self, name: Optional[str] = None) -> None:
        self.name = name
        if name is None:
            self.name = self.__class__.__name__
    @abstractmethod
    def run(self, context: Mapping[str, Any]) -> Mapping[str, Any]:
        pass
Similarly to pipelines, you must expose the exported tasks in common_lit_kaggle.tasks.__init__py
💡 All defined classes have to be manually exported in the corresponding __init__.py file. This might be a bit boring, but it helps keeping the imports clean in the individual files.
Table IO, Tables and Schemas
The remaining of the framework deal with a standard way of reading and storing tables. I’m using polars (https://pola-rs.github.io/polars-book/) instead of the more common pandas, simply because I was interested in trying it out.
To avoid rewriting the same code over and over, I defined these classes to facilitate the process.
Granted, the process is a bit convoluted because of the schemas.
However, it does add a nice check to catch mistakes when reading/writing data.
The process goes as follows:
- Define a schema you want to read or write
- Define a table that uses the schema
- Add these classes in the right __init__.py files
- Import them into a new Task and use them with table_io.
But what are these classes effectively doing? Let’s take a look.
Schema
All the framework is doing here is providing a way to convert a class to a dictionary:
class Schema:

    @classmethod
    def to_dict(cls):
        data = {}
        for attr_name in dir(cls):
            # Hopefully ignore all private fields
            if not attr_name.startswith("_"):
                data[attr_name] = getattr(cls, attr_name)
        return data
Table (TableReference)
This defines basically where you can find a table, it’s name, it’s schema and the expected format
import pathlib
from dataclasses import dataclass
from common_lit_kaggle.framework.schema import Schema

@dataclass
class TableReference:
    name: str
    path: pathlib.Path
    schema: type[Schema]
    format: str
Table IO (table_io.py)
Here we use a TableReference to effectively read/write data, and validate its schema against what is passed around.
import logging
import os

import polars as pl
from common_lit_kaggle.framework.table import TableReference

logger = logging.getLogger(__name__)

def _validate_schema(polars_dataframe: pl.DataFrame, table: TableReference):
    schema_dict = table.schema.to_dict()

    for column in polars_dataframe.columns:
        column_type = polars_dataframe[column].dtype
        # logger.info("Found column: %s (type: %s)", column, column_type)
        expected_col_type = schema_dict[column]
        assert (
            expected_col_type == column_type
        ), f"Column type mismatch. Expected: {expected_col_type}, found: {column_type}"

def read_table(table: TableReference) -> pl.DataFrame:
    logger.info("Reading table: %s", table)
    polars_dataframe = None

    if table.format == "csv":
        polars_dataframe = pl.read_csv(table.path)
        _validate_schema(polars_dataframe, table)

    assert (
        polars_dataframe is not None
    ), f"Invalid or unsupported format: {table.format}"

    return polars_dataframe

def write_table(dataframe: pl.DataFrame, table: TableReference):
    if table.format == "csv":
        _validate_schema(dataframe, table)
        try:
            os.makedirs(table.path.parent)
        except FileExistsError:
            pass
        dataframe.write_csv(table.path)
    else:
        raise TypeError(f"Invalid or unsupported format: {table.format}")
That’s it! We’ve gone through the entire framework! That being said, there’s still a lot to cover. In the next sections, we’ll take a look at:
- the config management
- mlflow integration
- understanding an example pipeline end-to-end
- understanding the deployment process to Kaggle and submitting a pipeline into the competition
Settings
Inside common_lit_kaggle.settings.config we define a Singleton (https://en.wikipedia.org/wiki/Singleton_pattern) class.
Here we define configuration parameters like directory paths and so on. The reason why it’s a Singleton class is that we want to be able to override it for the Kaggle notebook. We’ll see in a later section how that works.
For executing locally, all you need to do is modify directly this file.
One currently missing feature is automatically creating all the path references to the local directory:
self.data_intermediate_dir = pathlib.Path(self.data_root_dir / "intermediate")
self.data_exploration_dir = pathlib.Path(self.data_root_dir / "exploration")
self.data_train_dir = pathlib.Path(self.data_root_dir / "train")
self.data_test_dir = pathlib.Path(self.data_root_dir / "test")
self.plots_dir = pathlib.Path(self.data_root_dir / "plots")
self.models_root_dir = pathlib.Path(self.data_root_dir / "models")[[
This is something I still have to implement, so when you run the pipeline the first time you’ll probably run into some issues.
Please ping me if this is still not done when you get to test a pipeline.
Mlflow
I’m using mlflow to register experiments score and compare different models (https://mlflow.org/). Usage is very simple, I just started a web server locally with poetry run mlflow ui
Then I can access it on localhost:5000:
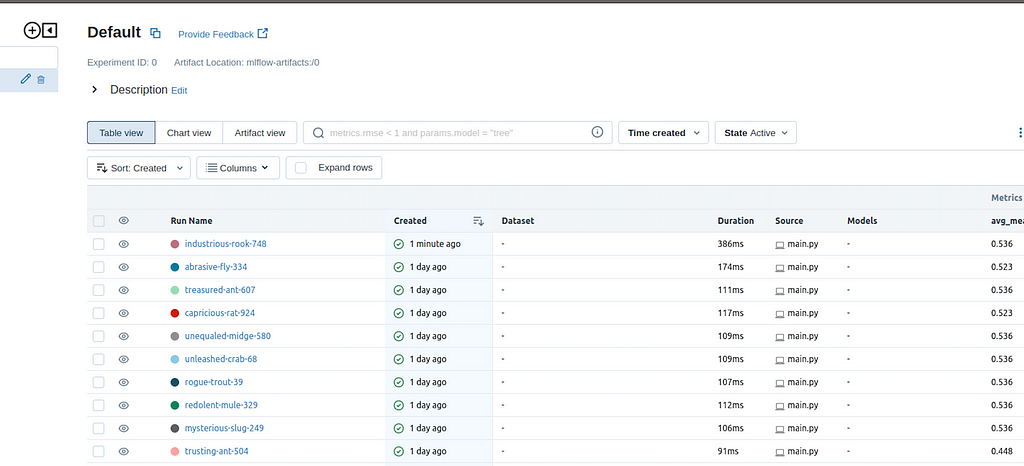
Runs are created automatically by the framework. What I’m doing is manually adding metrics and parameters.
Usage is as simple as using mlflow.log_param and mlflow.log_metric:
import mlflow

mlflow.log_param("distance_metric", config.distance_metric)
mlflow.log_metric("wording_mean_squared_error", wording_score)
Note that this doesn’t run in Kaggle, so I wrap mlflow into a separate module also called mlflow, that simply returns a mock if the import fails.
Full example for a simple pipeline
Let’s look at an actual pipeline, end to end. Let’s use the basic_train_linear_regressor as the example, as it uses all features:
from common_lit_kaggle import tasks
from common_lit_kaggle.framework import Pipeline

LABEL = "basic_train_linear_regressor"

class BasicLinearRegressorPipeline(Pipeline):

    def __init__(self) -> None:
        super().__init__(
            LABEL,
            [
                tasks.ReadTrainDataTask(),
                tasks.AddBasicFeaturesTrainTask(),
                tasks.TrainBasicLinearRegressorTask(),
                tasks.ReadTestDataTask(),
                tasks.AddBasicFeaturesTestTask(),
                tasks.TestBasicLinearRegressorTask(),
                tasks.WritePredictionsTask(),
                tasks.AnalysePredictionsTask(name=LABEL),
            ],
        )
First we load the train data. Note that this data split was created by another pipeline (SplitTrainTestPipeline):
from typing import Any, Mapping

from common_lit_kaggle.framework import table_io
from common_lit_kaggle.framework.task import Task
from common_lit_kaggle.tables import TrainSplitTable

class ReadTrainDataTask(Task):

    def run(self, _: Mapping[str, Any]) -> Mapping[str, Any]:
        input_data = table_io.read_table(TrainSplitTable())
        return {"train_data": input_data}
Then we add some dumb basic features to the data. Notice how we’re using the context dictionary to pass state between the tasks.
from typing import Any, Mapping
from common_lit_kaggle.features import add_basic_features
from common_lit_kaggle.framework.task import Task

class AddBasicFeaturesTrainTask(Task):

    def run(self, context: Mapping[str, Any]) -> Mapping[str, Any]:
        train_data = context["train_data"]
        enriched_train_data = add_basic_features(train_data)
        return {"enriched_train_data": enriched_train_data}
We then train a linear regression model using scikit-learn:
class TrainBasicLinearRegressorTask(Task):

    def run(self, context: Mapping[str, Any]) -> Mapping[str, Any]:
        config = Config.get()
        train_data: pl.DataFrame = context["enriched_train_data"]

        # Get features
        try:
            extra_features = context["extra_features"]
        except KeyError:
            extra_features = None

        features = config.used_features

        if extra_features:
            features.extend(extra_features)

        x_features = train_data.select(features).to_numpy()
        # Get wording labels
        y_wording = train_data.select("wording").to_numpy()
        # Get content labels
        y_content = train_data.select("content").to_numpy()

        content_regressor = LinearRegression()
        content_regressor.fit(x_features, y_content)

        wording_regressor = LinearRegression()
        wording_regressor.fit(x_features, y_wording)

        return {
            "wording_regressor": wording_regressor,
            "content_regressor": content_regressor,
            "features": features,
        }
We then repeat this for the test split, nothing too fancy there:
tasks.ReadTestDataTask(),
tasks.AddBasicFeaturesTestTask(),
tasks.TestBasicLinearRegressorTask(),
Maybe this one should be renamed to PredictBasicLinearRegressorTask 😀
class TestBasicLinearRegressorTask(Task):

    def run(self, context: Mapping[str, Any]) -> Mapping[str, Any]:
        test_data: pl.DataFrame = context["enriched_test_data"]
        original_test_data: pl.DataFrame = context["test_data"]

        wording_regressor: LinearRegression = context["wording_regressor"]
        content_regressor: LinearRegression = context["content_regressor"]

        used_features = context["features"]

        x_features = test_data.select(used_features).to_numpy()

        wording_preds = wording_regressor.predict(x_features)
        content_preds = content_regressor.predict(x_features)

        data_with_predictions = original_test_data.with_columns(
            pl.Series(name="wording_preds", values=wording_preds),
            pl.Series(name="content_preds", values=content_preds),
        )

        return {"data_with_predictions": data_with_predictions}
We output the predictions:
from typing import Any, Mapping

import polars as pl
from common_lit_kaggle.framework import table_io
from common_lit_kaggle.framework.task import Task
from common_lit_kaggle.tables import OutputPredictionTable

class WritePredictionsTask(Task):

    def run(self, context: Mapping[str, Any]) -> Mapping[str, Any]:

        data_with_predictions: pl.DataFrame = context["data_with_predictions"]
        output = data_with_predictions.select("student_id", "content", "wording")
        table_io.write_table(output, OutputPredictionTable())
        return {}
Note that this OutputPredictionTable is already in the format expected by the Kaggle competition. And lastly, we analyse the results in our train split:
class AnalysePredictionsTask(Task):
    def run(self, context: Mapping[str, Any]) -> Mapping[str, Any]:
        config = Config.get()

logger.info("Analysing predictions...")
        data_with_predictions: pl.DataFrame = context["data_with_predictions"]
        mlflow.set_tag("name", self.name)

        for idx, feature in enumerate(config.used_features):
            mlflow.log_param(f"features_{idx}", feature)

        for idx, prompt in enumerate(config.train_prompts):
            mlflow.log_param(f"train_prompt_{idx}", prompt)

        mlflow.log_param("distance_metric", config.distance_metric)
        mlflow.log_param("sentence_transformer", config.sentence_transformer)
        mlflow.log_param("distance_stategy", config.distance_stategy)

        wording_score = mean_squared_error(
            data_with_predictions.select("wording_preds").to_numpy(),
            data_with_predictions.select("wording").to_numpy(),
            squared=True,
        )

        logger.info("Wording error: %s", wording_score)

        mlflow.log_metric("wording_mean_squared_error", wording_score)

        content_score = mean_squared_error(
            data_with_predictions.select("content_preds").to_numpy(),
            data_with_predictions.select("content").to_numpy(),
            squared=True,
        )

        logger.info("Content error: %s", content_score)

        mlflow.log_metric("content_mean_squared_error", content_score)

        mean = (content_score + wording_score) / 2

        logger.info("Mean error: %s", mean)

        mlflow.log_metric("avg_mean_squared_error", mean)
        logger.info("Plotting predictions...")

        plot_labels_x_predictions(
            "wording",
            data_with_predictions.select("wording_preds").to_numpy(),
            data_with_predictions.select("wording").to_numpy(),
        )
        plot_labels_x_predictions(
            "content",
            data_with_predictions.select("content_preds").to_numpy(),
            data_with_predictions.select("content").to_numpy(),
        )
        return {}
I hope that was clear! We have only one step left, which is understanding how to connect this with Kaggle.
Kaggle notebook and datasets
In our repository, we use the kaggle CLI https://github.com/Kaggle/kaggle-api to programmatically interact with datasets.
Typically, we define a dataset metadata, as we saw in the git hook section.
For our example configuration, once we run kaggle create datasets, and this is the dataset.
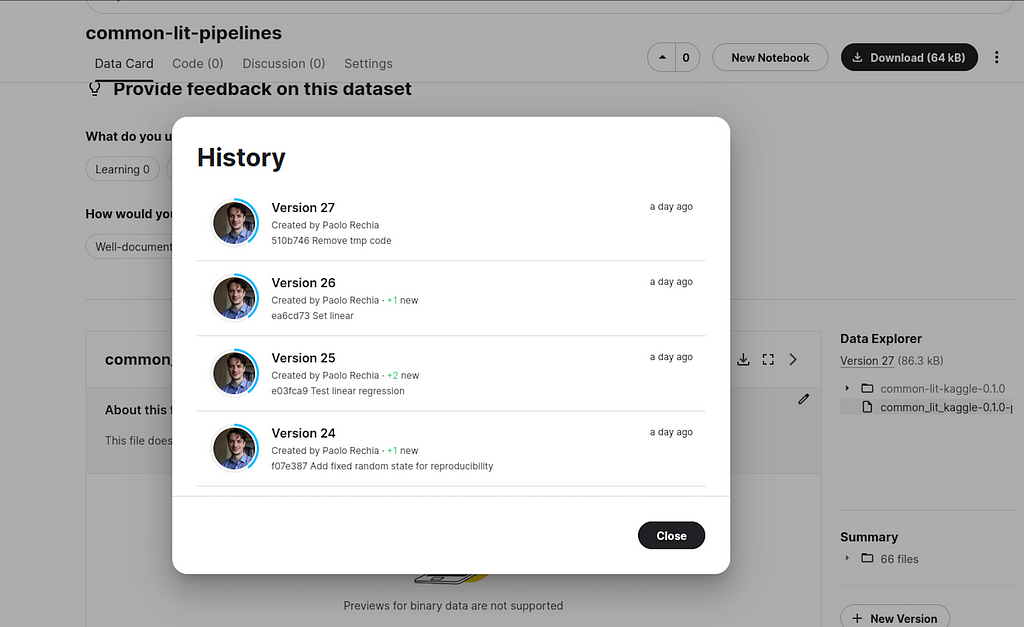
From that point, we can just publish new versions with:
kaggle datasets version -m “message”
Remember this is automatically done by the pre-push git hook. As a result, we have a nice history of pushed versions:
If you’d like to skip pushing a version to Kaggle, you can always do git push –no-verify to skip the git hook.
We can see an example notebook in Kaggle here.
On the right side you’ll see our dataset as part of the inputs:

Notice a small icon to the side of the common-lit-pipelines, click on it if you see it to update the version:
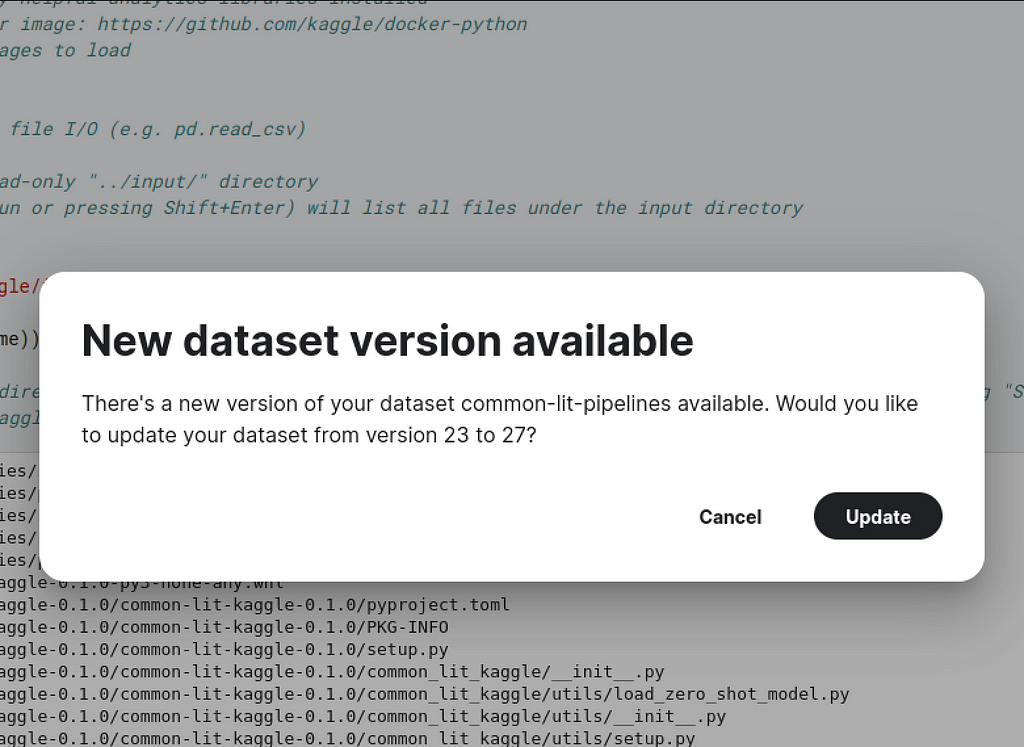
Updating this dataset essentially means updating your code version.
Make sure to restart the notebook compute resource just to be safe. Then click run all, and the notebook will handle the code installation, and the pipeline will run 🙂
Let’s see some code snippets.
Overriding the configuration
import pathlib
import common_lit_kaggle

from common_lit_kaggle.settings.config import Config

config = Config.get(
    root_dir="/kaggle/working/",
    input_dir="/kaggle/input/commonlit-evaluate-student-summaries",
    output_dir="/kaggle/working/",
    train_prompts = ["3b9047"],
    test_prompts = [
        "814d6b",
        "ebad26",
    ],
    used_features = [
            "text_length",
            "word_count",
            "sentence_count",
            "unique_words",
            "word_intersection",
    ],
)
Enabling logs
from common_lit_kaggle.utils.setup import create_stdout_handler
create_stdout_handler()
Splitting Data
from common_lit_kaggle.pipelines import SplitTrainTestPipeline
split_pipe = SplitTrainTestPipeline()
split_pipe.run()
Running a full train/prediction pipeline
from common_lit_kaggle.pipelines import BasicPredictRandomForestPipeline
pipe = BasicPredictRandomForestPipeline()
pipe.run()
Submitting a solution with the notebook
Once you run your notebook for testing, you can check it ran successfully by manually inspecting the output file. On your right side, on the file navigator you should find a .csv file called submission.csv.
Download and inspect it. It should look something like this:
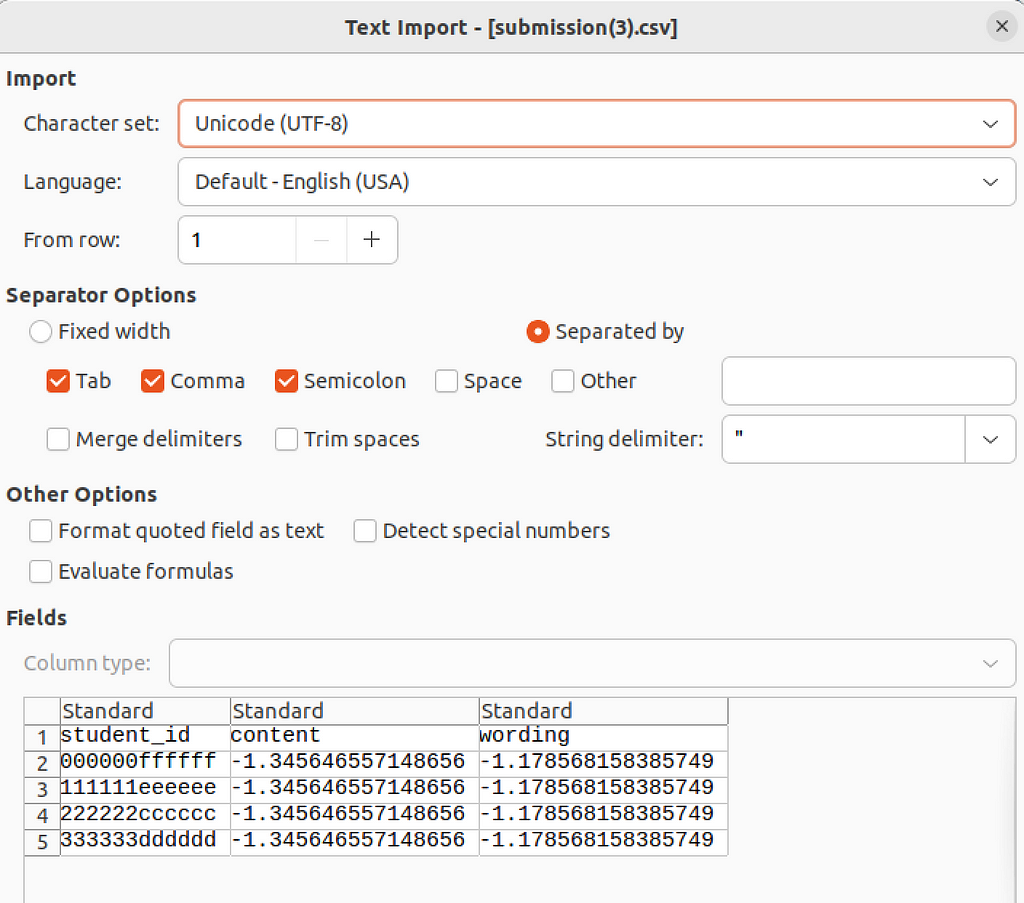
It’s just some stub data from Kaggle, so you can test you’re creating output in the expected format. If it looks good, click on Submit!
Practicing Data Engineering with a Kaggle Competition was originally published in Better Programming on Medium, where people are continuing the conversation by highlighting and responding to this story.