Fast track UTAM test execution using GitHub actions

In the last article, I talked about UTAM, the UI Test Automation Model that lets us write user interface tests for Salesforce or any other application based on the Page Object model design pattern. By now, I’m sure you are well versed in it, but what if we take automation a step further? Adding the UI tests in our CI/CD workflow.
Prerequisites
Before making changes to your project, ensure you have all the dependencies installed already. If you’ve already used UTAM, there are no new packages to add, but just in case, here are the prerequisites to follow this tutorial:
- UTAM and its dependencies. Check them here.
- Yarn, you can get it here.
- WebdriverIO, here are the installation steps.
- Some UI tests using UTAM.
Setting up the project
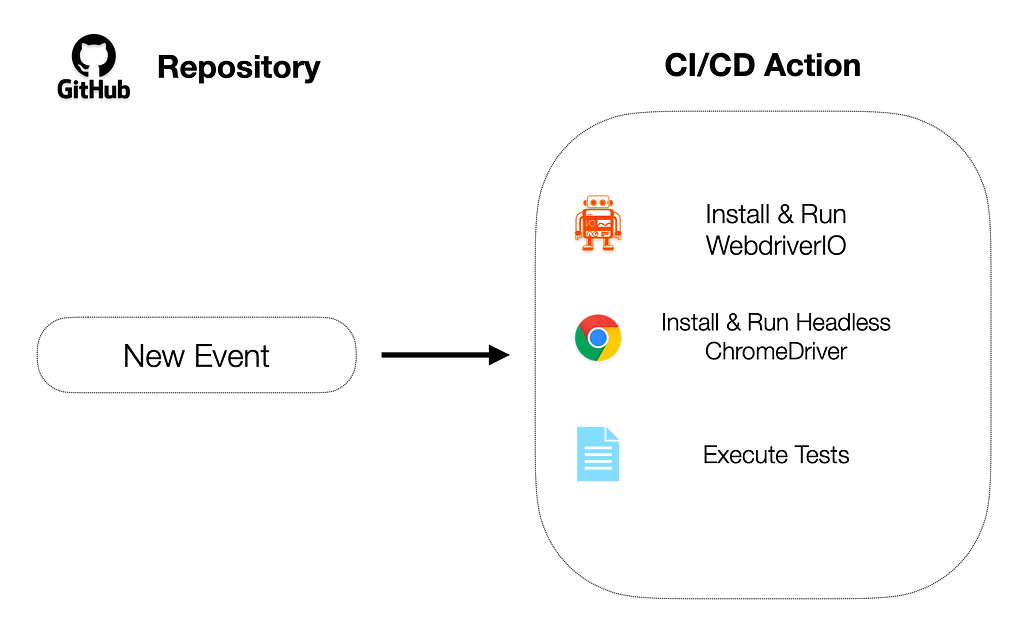
Running your tests locally, you have most likely followed something like the architecture in the image. The test execution starts, WebdriverIO is launched, and it runs a driver that opens up a browser. You will, then, be able to see all the tests being run as if a user was going over them.

We will use this flow as a base and recreate the same behaviour in GitHub. To do that, we will create a GitHub Workflow that describes the steps in the flow. Don’t worry, you can follow the logic in the workflow even if you are unfamiliar with it.

Let’s start by configuring the browser driver. In our case, we will be using Chrome, but you can do the same for other browsers. We need to run the browser in an unattended environment without any visible UI, so we need to use the headless mode. This means the browser window won’t be visible, as it will be running in a CI/CD flow.
The configuration is fairly straightforward, go to the wdio.conf.js file in your project and verify the chromeOptions section so it contains the headless flag like in the example below:
capabilities: [
        {
            maxInstances: 1,
            browserName: 'chrome',
            'goog:chromeOptions': {
                args: ['--headless=new'],
            },
        },
    ],
You can find the full setup of the file in the UTAM documentation or in the WebdriverIO site.
We’ll also add a script with the command to run our tests. Head over to the package.json file in your project and add the command you use to execute your tests. Mine are hosted in the force-app/test folder, so I’m referencing it in the script.
 "scripts": {
        "utam:test": "yarn test --spec force-app/test"
    },
That’s all the setup you need! We are now ready to create a new GitHub action.

You should see a folder called workflows. That’s where we will be placing the action. Create a new file and name it main.yml and copy the example below.
name: main
on: [push, pull_request]
jobs:
  build:
    runs-on: ubuntu-latest
    steps:
        - name: Checkout
          uses: actions/checkout@v2
        - uses: actions/setup-node@v1
          with:
            node-version: 18
        - name: Install all dependencies
              run: |
                  yarn cache clean --all
                  yarn install --immutable
        - name: List dependencies
          run: |
              yarn list
        - name: Test
          run: yarn utam:test --browsers chrome
Breaking down the workflow
The action you’ve just added will be launched every time a new merge or pull request is created, and it contains two main parts:
- Installation of all the dependencies
- Test execution
This first portion of the workflow will start by cleaning the cache and installing all the dependencies.
- name: Install all dependencies
              run: |
                  yarn cache clean --all
                  yarn install --immutable
Notice I’ve added the — immutable flag after the installation command. This will force yarn to use the yarn.lock file, which contains the latest stable versions of all the dependencies in the project. You can always omit this flag, but this is a good practise when working within the pipeline’s context. It avoids any updates to the project’s package that have not been tested first, and this is, in fact, a common error I encountered when updating the Chrome driver automatically as UTAM. It doesn’t always support the newest version!
In case you want to use this option, verify the yarn.lock file is present in the project. Otherwise, you can always omit the flag and use the package.json as a reference.
The second portion of workflows calls the script we have added in the package.json and specifies the browser to be used during the test execution.
- name: Test
          run: yarn utam:test --browsers chrome
You are now fully automatized! Feel free to modify the workflow and add any logs or triggers.
Some additional resources
- Get familiar with GitHub Workflows and modify your script.
- Look for alternative ways of connecting to your environment or org by creating a JWT connection in Salesforce.
- Learn more about the headless mode from the Chrome developers themselves.
- Check the GitHub action example on the WebdriverIO site.
- Read more about yarn lock package usage.
Run UI Tests in Your CI/CD Workflows was originally published in Better Programming on Medium, where people are continuing the conversation by highlighting and responding to this story.