How to setup the library and implement the first snapshot test cases for iOS apps

Several companies offer digital services through web and mobile applications. In this digital era, ensuring an application delivers on its promises is crucial for the business’s success. Users expect uninterrupted access to services such as making purchases, completing bank transfers, or requesting a taxi whenever needed. Encountering bugs is a frustrating experience for customers, potentially leading them to abandon the service or switch to a competitor’s app.
In a development team, it’s not enough to only ensure that the application works according to the business rules in the first implementation. It’s essential to protect the software from unwanted behavior that can be introduced by other developers when modifying or adding functionalities. To achieve this, automated tests are a powerful development tool, enabling the identification of behavior failures without manual intervention.
Among the various automated testing approaches, one such method is Snapshot Testing. This test consists of capturing images of the application’s screens and comparing them with new images obtained during the test execution to verify the occurrence of undesired changes. This test checks various visual elements such as texts, fonts, colors, and spacing. The goal is not to test the application logic but rather to verify if the view is presented correctly according to the expected outcome.
In this article, we will explore the iOSSnapshotTestCase library, learn how to set it up in an iOS project and discover best practices for implementing Snapshot Tests using Swift. To illustrate the concepts, we will use a simple application with a single screen displaying a list of countries. The project follows the MVVM (Model-View-ViewModel) standard and employs a protocol-oriented architecture that applies the dependency inversion principle, ensuring the application’s testability. The source code is available on GitHub.
Disclaimer: This article provides an overview of Snapshot Tests and explains the functionality of the iOSSnapshotTestCase library. It does not serve as a recommendation or guide for making technical decisions regarding adopting this testing method. It’s always necessary to consider the problem at hand and carefully evaluate the inclusion of any methodology or tool in the project, including its costs and potential side effects. Snapshot Tests can be resource-intensive and may impact the development process if implemented without proper consideration. Therefore, they should not be implemented indiscriminately.
With this in mind, it is valuable to comprehend how the library functions, thus expanding our range of available tools.
The iOSSnapshotTestCase Library
IOSSnapshotTestCase (previously FBSnapshotTestCase) is a library originally developed by Facebook and currently maintained by Uber. It can generate screen snapshots from the UIViews and compare them against reference images stored in the source code repository. When differences are detected between the captured and reference images, the test fails, and an image highlighting the discrepancies is automatically generated for debugging purposes.
To incorporate the IOSSnapshotTestCase library into your project, open the project’s Podfile and add the library as a dependency by including the following lines:
target "CountryListTests" do
  use_frameworks!
  pod 'iOSSnapshotTestCase'
end
After including the library, you must run the pod install command in the project folder to incorporate the dependency.
Note: If you use Carthage or Swift Package Manager, you can include the library by following the instructions in the official iOSSnapshotTestCase repository.
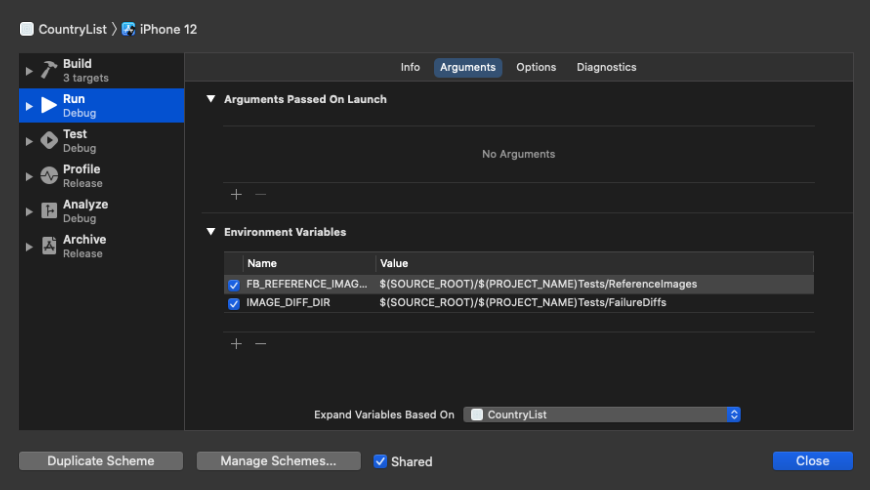
Next, you must configure the environment variables required for storing the reference and differential images in the project’s repository. To do this, follow these steps:
- Access ‘Product → Scheme → Edit Scheme’ in XCode.
- Navigate to the ‘Run’ tab.
- Add the following variables to the scheme:

Note: It is crucial to define the environment variables in the Run scheme rather than the Test scheme. Otherwise, the generation of images will not occur correctly.
Creating Snapshot Test Cases
First, let’s add a file to the test folder to assist with test configurations. This file will simplify the creation of diff and reference image folders in the repository and prevent issues arising from directly calling snapshot library functions.
Next, we can write our first test case. It’s important to note that snapshot tests aim to verify the behavior of the view layer and do not involve testing the application’s business logic. Additionally, asynchronous tasks such as HTTP calls should be avoided in a test scenario to prevent test slowness and intermittent results.
To isolate the ViewController that needs testing, we need to define a class that mocks the behavior of the ViewModel layer. Since the application components are based on protocols, we can easily implement the CountryListViewModeling protocol to create a mock for the ViewModel class. Here’s what that looks like:
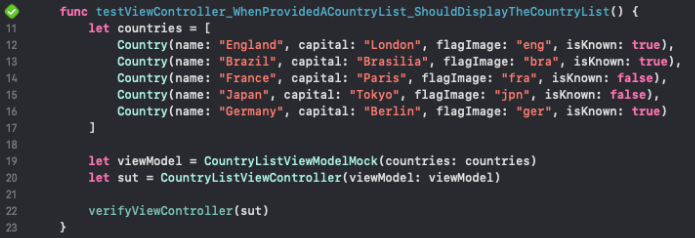
With the mocked ViewModel in place, we can proceed to write the first snapshot test for our application:
The test involves defining an array of countries and creating mock objects for the ViewModel and the system under test (sut), which refers to the ViewController being tested. Next, we call the presentCountries function to display the screen to the user. Finally, we use the verifyViewController helper function to run the snapshot test.
Upon running the test for the first time, we encounter the following error message:

It occurs because no reference image is available for comparison with the screen being tested. Therefore, we need to generate the reference image by adding a configuration to the test’s setUp function in the CountryListViewControllerUITests class:
After adding the setUp function and rerunning the test, a new error message is displayed:

This error indicates that the reference image has been generated correctly, allowing us to proceed with the test. To do this, we must either remove the previously defined setUp function or set the recordMode flag value to false. Then you can rerun the test to check if it succeeds. Here’s what a successful test looks like:

Well done! Every time the automated tests are run, whether on a local machine or a CI pipeline, it will ensure that the ViewController continues to display the expected results.
Let’s consider a scenario where another developer unintentionally deletes the line that configures the cell’s images:
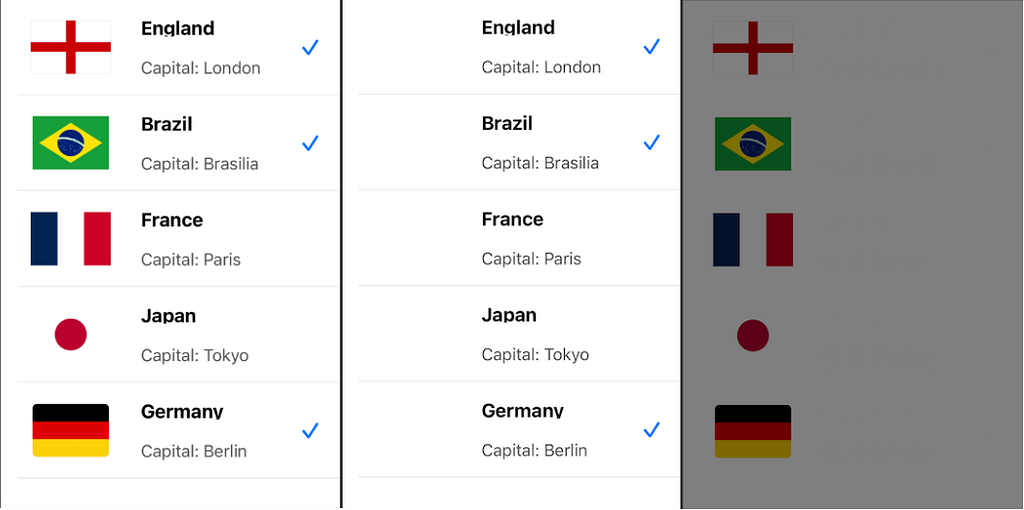
When running the test after this change, a failure is observed with the message: ‘failed — Snapshot comparison failed.’ Additionally, navigate to the project folder at CountryListTests → FailureDiffs → CountryListTests.CountryListViewControllerUITests, you can access the reference images, the image obtained in the last test, and the image highlighting the differences. This greatly facilitates the debugging process.

Important: In projects with a CI configuration that automatically runs unit and UI tests upon opening a pull request, it is crucial to commit and upload the files to the remote repository to ensure correct execution. Additionally, when updating screens due to changes in business rules, it is necessary to update the reference images associated with those screens.
To update the reference images, simply enable the desired test classes with the recordMode flag. This mode allows the snapshot library to capture the current state of the screens and save them as new reference images. By following this process, you can ensure that the reference images stay updated with the latest changes in the application’s UI.
Testing Different Scenarios
An intriguing aspect of snapshot testing is the ability to test different screen states by manipulating the input data. While we previously defined a test function for the success case of displaying a list of countries, it would also be valuable to include a test case for scenarios where no countries are available, resulting in an error message being displayed:
The test case for the empty country list is quite similar to the previous one, with the only distinction being an empty country array. By running the test with the recordMode flag enabled, we can verify that another reference image is generated in the folder CountryListTests → ReferenceImages_64 → CountryListTests.CountryListViewControllerUITests. Subsequently, running the test with the recordMode flag disabled should yield successful results for both written tests.

Conclusion
Snapshot testing is a robust tool for developers, offering assistance in safeguarding against inadvertent changes infiltrating the application’s user interfaces. This article introduced the IOSSnapshotTestCase library and showcased its fundamental implementation for snapshot testing. By employing this library, developers can ensure the integrity and consistency of their iOS projects, delivering enhanced user experiences.
Thanks for reading! If you have any questions, please leave a reply.
Resources
iOSSnapshotTestCase: A Guide to Snapshot Testing in iOS Projects was originally published in Better Programming on Medium, where people are continuing the conversation by highlighting and responding to this story.